I soldered a new battery into the rear temperature sensor on the Concours when I changed the back tire last year after picking up a puncture. The front was starting to get sluggish when connecting wirelessly, suggesting the battery was dying and the front tire was due a change, so I did that one in the fall. Unfortunately the sensor didn't pick up signal after reinstallation. Rather than beat up that old sensor again I started looking for alternative options.
I love a good hack, and Big Red walks you through one here on how to take aftermarket tire pressure sensors, program them to your stock Kawasaki and then use them instead of expensive stock items. The coding unit is $230, but works on anything, meaning I'm not beholden to a dealer for tire pressure sensors on the cars in the future either. A pack of 2 sensors is $95, so all together a full sensor replacement on the bike including the tool needed to program them was $325. The stock sensors are $258 each, so an eye watering $516 for the pair. $200 cheaper and I have the tool that's usable across a wide range of vehicles. That's my kind of hack!
How did it go? After all the frustrations with the Tiger and Triumph, the C14 reminded me how nice it is to work on a bike that's supported by its manufacturer, riders and the aftermarket.. When I compare the thriving online communities at COG and other online forums that support Kawasaki ownership, I can only think, 'way to go team green.' By comparison I read a post on one of the Triumph forums that said, 'these forums are dead. Everyone is giving up on these old bikes..." Except the bikes in question are not that old.
When I walked into my local Kawasaki dealer and ordered parts for my mid-nineties C10 there a few years ago there was never an issue. If I hop into an online forum for the Kwak I see an active community full of ideas and support. Most of the Hinckley Triumph forums for anything over 15 years old are derelict. The posts on them are at least five years old giving you some idea of what trying to keep an older Hinckley Triumph on the road is like (ie: impossible - the manufacture considers them disposable bikes). It makes me question owning another one, which is a real shame because I wanted to believe in the brand, but they only market their history, they don't honour it by supporting owners in keeping old Hinckley machines in motion.
Back in the land of the living, Big Red's walkthrough was spot on. I popped one side of the new front tire off the rim and removed the 14 year old sensor. I couldn't see why it wasn't getting power - my soldering looked good - maybe a bad battery? No matter, new parts are going in.
If you know Big Red's Mazda 3 2004 sensor hack matches Concours ones, then the rest is straightforward. I set the MaxiTPMS unit to the Mazda settings and then put in the ID number from the old C14 sensor. The wireless upload only took a few seconds.
I could also check the sensor once it was programmed, which gave me some piece of mind before putting it all back in the tire. Though an alternative is to set the sensor when it's installed, which is also an option (the programming unit could still see and modify the sensor in situ). This also means I can test and even reset sensors without having to pull the tire in the future!
The whole process was straightforward, aided by a warm March day where I could leave the tire in the sun while I set the sensor. Warm tires are much easier to stretch over the rim!
I installed the new sensor which fits snugly in the rim. All the parts including the tool from Autel felt like quality pieces that will last. With the tire reinflated I put the wheel back in and torqued everything to spec while also making sure everything was grease free (especially the brake bits).
I took it up the street with the intention of riding around the block because that's how long it usually takes to get the dash reading the wheel pressures, but this new sensor had it showing in seconds - before I even got a hundred yards up the road. I checked it against the digital tire pressure gauge and it's right on the money in terms of accuracy.
It felt good to have a win in the garage after banging my head against the Tiger for so long. Speaking of which, I recently attempted to plastic weld the part they won't supply any more and as I was putting it back together the wiring broke off on the fuel level unit (because I've had the tank off so many f***ing times!).
I'm so bloody minded I'm going to try and solder the wire back on even though it broke in the worst possible spot (right at the unit so there isn't much to work with). The stock unit probably isn't available and is a salty $155 even if it is. I'm doing this in part just to see if the latest attempt at keeping the old thing in motion works. The plastic welding on the idle speed control valve (which they don't even list in parts now) went well and the piece seems serviceable. I want to see if it works.
If I had more time I'd see if I could find an industrial CAD shop who could 3d scan it and then get me a file that I could use to 3d print a replacement. What would be even nicer would be if Triumph shared that CAD file with us all since they aren't bothered to produce the part anymore. With a bit of collaboration, the aftermarket could help keep older Hinckley Triumphs in motion.
As much as it pains me, I think I'm going to take Triumph's hint and let the Tiger go... which is something I never thought I'd say. So much for my goal of hitting 100k with it.
The 'Idle Speed Control Valve Housing' (Part Number: T1241064) continues to be a pain in my ass. This housing sits behind the throttle body on my 2003 Triumph Tiger 955i and it seems Triumph isn't supporting them anymore. My local dealer shrugged and said it isn't available any more, so I went further afield.
Blackfoot Motosports in Calgary's site seemed to suggest that they could provide this complex plastic piece that doesn't enjoy Canada's extreme temperature swings (I've gone through 2 of them so far). So I ordered it! Guess what:
That an O-ring should take 3 weeks is one thing, but the housing is obsolete? On a bike that's only just 20 years old? So, I did a little research. It turns out this product fits 84 vehicle variants across four Triumph Models between 1993 and 2020. A part that was in use on models four years ago is obsolete? That doesn't sound right.
No matter where I look the story is the same: this key part of the idle control system on thousands of bikes isn't available? Being a determined sort, I looked to ebay for options and came across Bike Spares Barn in the UK. They take bikes traded in at dealers that are still running and on the road and dismantle them for parts, which is what I'm reduced to using with my Triumph.
They had a throttle body with the needed idle control housing on it along with an airbox. My airbox isn't in great shape so I got both parts. They worked out with shipping to be about $300CAD. It took a good 3 weeks for the parts to get here (I ordered right after the holidays so I can't really fault the timeline). The seller was very communicative with what was going on so, unlike some ordering experiences, I was never left wondering where things were.
The box finally arrived and looked like someone had been playing football with it. Two corners were mashed in and a piece of the airbox was sticking out of the box. I unwrapped it and everything looked OK so I began to clean and dismantle everything. The airbox was a good idea, this one is in much better shape than my 24 Canadian winters one, but the throttle body didn't fare so well.
Inevitably, the only broken piece on the damned thing was the fragile idle housing, which was cracked around the base in exactly the same place that the one I'm trying to replace is.
So, I'm back where I started, but with a spare throttle body and two broken idle housings. This damned thing is so complicated that fabricating an alternative isn't likely. The three pipes on the bottom go out to each throttle body and servo sits inside that is moved up and down electrically adjusting the vacuum so passages open up to each throttle and modulate the idle so the bike doesn't stall. When this complex and fragile piece doesn't work as it should the bike hesitates on acceleration and stalls.
Obviously this wasn't the case because the bike it came from was working fine (they tested it before dismantling it), but it didn't survive ebay's international shipping service. I asked Bike Spares Barn what to do and they said to go through ebay's return/refund process, but ebay is cagey about sharing that anyware. Fortunately Peter at Bike Spares Barn helped me navigate the obfuscation and we've now gotten me a refund... but I'm still stuck without this part.
I've asked before and I'll say it again: if you're not willing or able to support your own machines, Triumph Motorbikes, how about sharing publicly the CAD files on this part so after market and crafty types like myself can fabricate our own? With the right fuel resistant plastic in a 3d printer, I could knock up my own version. But before I did I'd reinforce the model and design something more robust so I'm not left out in the cold again.
The happy face getting the solution to my problem in (the box on the bench)... then, well, you know what happened.
With Triumph giving up on my Tiger before I'm prepared to, I'm going to document the research and give details on what works when you're trying to keep a Triumph 955i's fuel system working by replacing old o-rings.
This has involved a crash course in o-rings and engine operating temperatures. As I work out a fix here I'll post details on o-ring sizing, what type works and include data on measuring the intake manifold at temperature.
It's been all Concours for the past few weeks while the Tiger is laid up. I'm hoping to get the fuel system sorted before the snows fly and I have to wait for next year.
Here are the measurements for the upper and lower fuel injector seals. The classy move by Triumph would be to open source publish the technical details for all the parts they no longer support so that the rest of us can get on with keeping the history of the marquee alive. With that in mind, here are the deets for the upper and lower fuel injector o-rings:
The thick ones go on top where the fuel injector meets the rail. My best guess is 3mm thick by 1.5cm outer circumference.
The skinny ones go on the bottom where the fuel injector slides into the intake manifold.
My best guess there is 2mm wide by 1.4mm outer circumference.
The Tiger is a metric bike, so I'll work in mm (if Triumph went imperial on o-ring, what the actual f***). The thicker o-ring is 1.5cm or 15mm outside diameter (OD) and (I think) about 3.5mm cross section (CS). Looking at that chart, the #203 is a 14.58mm outer diameter with a 3.53mm cross section. That makes it mighty close. What would be nicer would be if Triumph just came out and gave us the precise sizes for these parts it has discontinued. Triumph?
The thinner one is also a 1.5 (ish) mm outer diameter (15mm-ish), but the cross section is thinner - perhaps two and a bit mm, and they have a 2.62mm cross section standard o-ring size. You'd have to hope Triumph didn't make bespoke o-rings for their fuel injectors, right? For the skinny o-ring I think I'd take a swing at the 2.62mm cross section / 14.43mm (1.443cm) size.
The All O-Rings site also has a good description of the materials you want to get your o-rings in. Nitrile and Viton are what I went with in the pointless Amazon order, but those are the materials you want in a fuel heavy application like this.
That's the configurator (right) - pretty straightforward, but it sounds like they manufacture each order, which probably won't make this a viable solution for someone just trying to keep their old Triumph on the road.
If only there was some kind of network of retailers who supported Triumph motorcycles who could order this parts to help their customers keep their older Triumphs rolling... some kind of 'dealer' network who understand how parts work and how to order this sort of thing in large enough quantities to make a profit while offering customers what they need.
I'd prefer to use All O-Rings for the parts, but they might be a B2B type of thing, and I'm not a B.
Amazon's kits:
Turns out Amazon's shot-in-the-dark kits didn't work either. There's more to this o-ring sizing caper to come. I wish I could just 3d print the nitrile o-rings I was looking for (doesn't look like it's additive manufacturing friendly).
As a family we attended a blacksmithing day at Happy Knife Forge last weekend. Highly recommended, it's money well spent. Jason will not only show you the basics, but is keen to get you up and running as a blacksmith. My granddad was a coal merchant back in the old country and the smell of coke burning on the forge prompted a sense memory from the crib; it smelled like home.
I've ruminated on fabrication and micro-manufacturing on TMD before from a digital perspective using the latest techniques. Given the space and tools I'd quite happily spend my time designing and creating using everything from medieval blacksmithing through 20th Century metal working and on into 21st Century digital manufacturing techniques. Connecting these processes separated by time but with the same intent would produce some genuinely interesting and bespoke combinations.
I've had the itch to get back into welding for some time, but a lack of space and gear means I'm not while I'm where I'm at. The blacksmithing experience has me wanting to expand my metal working beyond just welding, which means even more space and kit getting added to the wish list. You can do a lot in a tight space, and I am, but when it comes to storing the chemicals and managing the heat in some of these processes, there is no substitute for space.
A property with an old industrial building on it would make for a fantastic restoration leading to a multi-millenial foundry covering everything from blacksmithing to digital design!
Given the time and resources I'd hit an intensive welding program, then set up my multi-millenial forge/shop/maker space with everything from blacksmithing tools through metal working and mechanical to 21st Century 3d scanning, digital modelling and printing. The forge would be in the corner of a repurposed, old brick building that also includes space for metalwork, all very fireproof. Across the floor in the same open concept.would be space for a paint booth/shot blasting station and plenty of mechanical workspace. Upstairs (open concept, with just a railing) would be digital design and manufacturing in a cleaner workspace. If I could walk out to that every morning to create, restore and repair, I'd hardly care if there were pandemics or anything else. Put it near some good riding roads (ie: not in Southern Ontario), and it'd be just about perfect.
I've been thinking about a digital workshop for a while now, but the blacksmithing experience has me thinking old school as well.
The future-garage scene in Big Hero 6 gets the digital side of it right.
As GP from Hammy Hamster would say, 'the elephants are against us.' With the outside trying to kill us again, I'm focusing on doing a complete tear down of the 1971 Triumph Bonneville project. I was originally going to see if I could get the bike in motion as it is, but a combination of factors including 1971 Triumph build quality and the early 80s muppet who tried and failed to turn the bike into a chopper's spannering skills have me now approaching this as a frame up restoration.
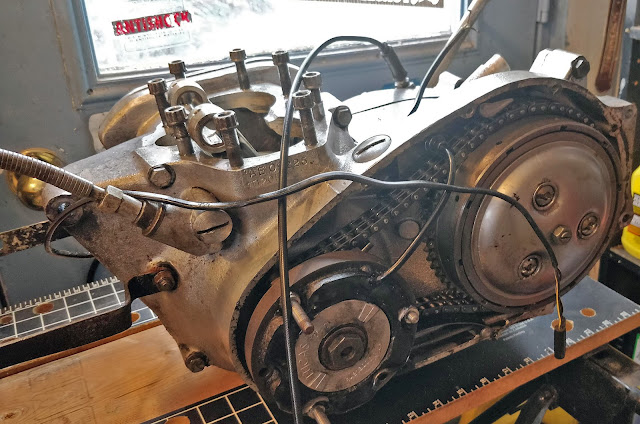
I've been working around the edges which has been good for reconnaissance in determining what state the bike is in, but now that I'm committed to doing the bike from the frame up the first job was to remove the bottom end of the motor and clear the way for a frame restoration:
The bottom end was surprisingly light and easy to lift out of the frame and none of the frame to engine bolts caused any problems. Some were quite loose, so a frame up resto is making more and more sense as I don't trust anything the chopper muppet did to the bike circa 1983.
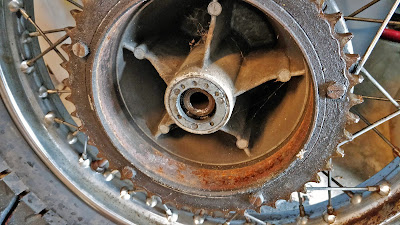
It was my first time into the rear drums and, like the fronts, they were age seized but otherwise not in terrible shape, though whenever I get into the dark places on this bike it looks like a scene out of Indiana Jones.
I've left the frame on the bench as I continue to strip it of accessories. The last time I did some coating work on a project bike it was with Fireball Coatings in Elora but seven years on they seem to have evaporated. I've been looking for alternate (and hopefully better) options and KC Coatings in Guelph looks promising. I intend to get in touch with them and see if we can shot blast and powder coat the Bonneville frame, I just have to make sure they can do it on a complicated oil-in-frame design like this one. Powder coating adds thickness and can cause problems with fasteners and fitting things back together so I need to find out if KC understands that and can can work with this one so that its mechanical pieces will still fit back together.
Following the frame I'll sort out both wheels (bearings, tires and inner tubes) before getting the rolling chassis back together and then rebuilding the motor with my swish new 750cc head.
Motor out and on a pop up workbench by the window. It's lighter than it looks.
I set up the Black & Decker WorkMate by the back door to the garage to give me somewhere to work on the bottom end of the motor. With the engine split and out of the frame, I can lift the parts off the bike around easily. I might put the bench away and make some space while the project is in pieces.
Revco is fantastic at shipping (even during a pandemic) and very transparent and communicative with delivery times. Everything I've gotten from them has been expertly packed, is new stock (no old/new tires). They know what they're doing with motorsport tires.
The Structure Sensor is an old generation 1 device and isn't as high resolution as I'd like, but it gives you a general sense of shape and proportions. Meshmixer is free from Autodesk and does a good job of fixing up voids and missing bits in the scan.
Structure.io came out with a higher resolution second generation model that they offer a discount on if you send in your old one. It might be time to trade up. My dream is eventually to get a 3d scanner that is accurate enough to scan and reproduce old motorcycle fairings that are out of production in order to produce millimetre accurate OEM replicas to keep old bikes on the road with new plastics via 3d printing accurate reproductions.
The next step would be to scan a customer's fairings and offer customized options based on 3d modelling. It would be relatively easy to reproduce high quality copies of fairings with some interesting variations in design. Alternate cooling, MotoGP style wings and even craziness like a motorcycle fairing redesigned with dragon scales of made out of feathers are well within the realm of 3d modelling/3dprinting.
The customized fairing/3d printing direction hasn't been explored yet. Accurate 3d modelling would also allow a micro-manufacturing concern to reproduce the old plastic bits that are wearing out on bikes from holders and brackets to dash pieces. Because they're 3d modelled, this would eventually build a library of out-of-production parts that could keep a wide variety of bikes on the road.


.gif)


