Sunday 31 October 2021

50 Year Old Triumph Bonneville Restoration: Amal Carbs and the Fuel Tank

A place where logic, precision and cause and
effect still matter in a world gone mad.
 After the random weirdness of work, time in the garage with the old Bonneville is remarkably
straightforward and logical.  I suspect the bike was in the middle of a Captain America Easy Rider customization in the early/mid eighties when it got parked and time left it behind.  I got it from Brian's storage shipping container where it was out of the weather and raised off the ground.  I don't know where Brian got it from but I suspect it was always stored inside.  I battled with a mid-nineties Kawasaki that had been left outside back in 2014 and this much older machine is nothing like as seized, rusted and difficult to get into.

Anything that doesn't immediately loosen gets a bit of heat and then comes free without any headaches.  Not being in a rush and leaning on the spannering skills I've refreshed over the past decade is making this an enjoyable and meditative process.


The surface rust came off the tank with a bit of sanding.  I'm going to see if I can knock out the dent and then strip it all back.  I used Metal Rescue on the Honda Fireblade tank in my last project and it did a fantastic job of cleaning that unused and rust tank out.  I'll let it sit overnight and then do the power wash tomorrow and hopefully the tank'll come back to me.

The Amal carburetors on the bike are remarkably simple compared to what I've been up against before.  Last time around it was a bank of four last-generation-before-fuel-injection carbs on a '97 Honda Fireblade.  Before that it was a bank-of-four on a '94 Kawasaki GTR1000 and then another complex bank of four on an '81 Yamaha XS1100.  The old Bonnie's single Amal carb per cylinder is a simpler design from a simpler time compared to those complex Japanese four-pot carbs.

Airbox sleeves off.

Carb clean up with a fine wire brush and wd40.

Some aluminum corrosion in the bottom of the carb bowls but it cleaned out nicely.

They've been sitting for a long while, but all the hard parts look to be in good shape.


After an initial cleanup I'm going to break down each carb and clean the hard parts in a ultrasonic cleaning bath before reassembling with new gasketry from British Cycle Supply Co..

Ultrasonic bath bringing the carbs back to clean and ready to breathe for the Bonnie again.

My plan is to get the bike operational mechanically and have it going next spring having cleaned up and rust painted the frame and body.  Once it's operational I'll ride it for a season rough and get to know it before looking to a complete engine rebuild and deeper restoration of frame and body panels at a later date.

In order to get it back to rideable, these are the parts I think I'll need:

  • carb gasket rebuild kit x 2
  • exhaust pipes x2
  • mufflers x2
  • ignition cables (and possibly some other electrics)
  • headlight
  • indicators
  • battery
  • head and sump gaskets for the motor (I intend to go in and clean things out/have a look around before I run it)


Monday 25 October 2021

1971 Triumph Bonneville T120 Online Resources


Searching the internet for parts and technical details for a 1971 T120 Triumph Bonneville 650cc air cooled twin.  Here's what I've found - hope it helps if you're looking for similarly vintage parts and details.


Technical Details

https://cdn.shopify.com/s/files/1/0717/0717/files/1971_Oil_In_Frame_650_Unit_Twins_All_Models_EXPORT.pdf?2276925620862086622

https://www.tomcc.org/Triumph/FrameNumbers

https://www.fagengine.com/blogs/tech/triumph-engine-and-frame-numbers

https://triumph-tiger-90.com/dating-your-triumph/

https://www.baxtercyclebooks.com/FB/Triumph_1971_650cc_models/index.html

https://wiringdiagram.2bitboer.com/1971-triumph-bonneville-wiring-diagram/


https://drive.google.com/file/d/1sbSds50ChTpY_7q8SkhFVOQ5QoRAgc6y/view?usp=sharing
Love me some hand drawn drafting!

Parts

https://vintagetriumphparts.com/?model_filter_id=7

https://www.lowbrowcustoms.com/collections/vintage-triumph-parts

https://www.trojanclassics.com/header-pipes-triumph-tr6-t120-1971-balanced-pair-g

https://burtonbikebits.net/triumph-parts/

https://www.baxtercycle.com/product-category/vintage-triumph/

https://www.thebonnevilleshop.com/

https://kmjonesmotorsports.com/about

British Motorcycle Supply Co.  (with Canadian Contact info!  Thx Brian!)

http://www.britcycle.com/Catalogues/2014pdfCat.pdf

http://www.britcycle.com/default.htm

http://www.britcycle.com/help.htm

Sunday 24 October 2021

Triumph Tiger 955i on the edge of winter

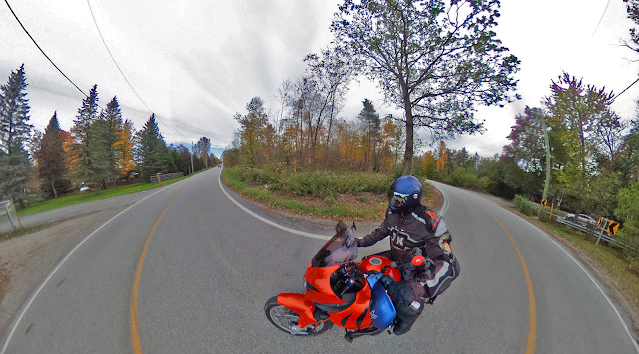
 Single digit temperatures make for a brisk ride.  This one was down to Guelph Line before coming back home and warming up again.  All photos taken with a Ricoh Theta 360 camera set to fire automatically every 6 seconds, attached to the rear view mirror using a flexible tripod.  Here's a walkthrough if you want to try it yourself.


Sunday 17 October 2021

1971 Triumph Bonneville Motorcycle Restoration: the baseline

 Baseline photography for this 1971 Triumph Bonneville restoration project:


According to Low Brow Customs, this means I've got an A (January) E (October 1970 - July 1971) and was the 9125th 650 twin made that year (00100 is the starting number for each grouping so this was the 9225-100th motor made in the 1970-71 batch).
The frame was tricky to pick out - one of those sites mentions that the stampings are sometime very thin and this one's barely there - our best guess is AE07050, which would put it in the same month/year as the motor, which seems promising.


The chopper stuff has started to come off and the bike is up on a wooden base on the stand in the back of the shop.  


Next up will be taking the tank off and beginning the GREAT DISMANTLE OF 2021!

Tuesday 12 October 2021

Motorcycle Riding In The Rain: Algonquin Park in October in 360 Degrees

 Deerhurst Resort to Algonquin Park and back again, chased by the rain.

Algonquin Park in the rain at the height of autumn colours. The Theta 360 camera held up but I eventually pocketed it when the deluge become too heavy.  The camera is mounted on a ball mount on the handlebars and set to fire automatically every 10 seconds.  Photos captured in the Theta camera app and then modified/enhanced in Photoshop.


This is the raw photo out of the camera. The fixed lense doesn't collect a lot of light, so on a dim, rainy day like this the image is quite muddy.  I brought up the shadows in Photoshop and the result (with a bit of cropping) is the same photo above.


If you're curious about how to put together on-bike photos, check this how-to out.  It's also available on Adventure Bike Rider Magazine's site here.  You can pick up a simple 360 camera for a couple of hundred bucks.  Fully waterproof ones (which I obviously need) start a bit higher.

I got into this with Ricoh's Theta way back in 2013, but Ricoh has been stingy about support and won't even offer me at-cost options for educational use.  Looking around recently, the Insta360 offers some interesting combinations with next generation 360 imaging, though it's very video focused and I prefer still shooting.  Gopro also has the 360 Max, though it isn't as aerodynamic and therefore might not be the thing to put on a bike in the wind, though I'm willing to give it a go.

Gopro goes out of its way to support users and especially ones who advertise for them on social media.  I wish Ricoh were so forward thinking, but they aren't.  I'd suggest the Gopro if you want to get into 360 photography.  It's remarkably easy to set up and the results look fantastic.  You should give it a try.


Post from RICOH THETA. - Spherical Image - RICOH THETA