Showing posts sorted by date for query 1971 Bonneville. Sort by relevance Show all posts

Thursday 17 February 2022

1971 OiF Triumph Bonneville Restoration: a seized top end

The old Triumph motor has refused to turn ever since I picked it up in the fall.  Every attempt at cycling the engine has failed so last weekend I dug into the top end, which turned out to be much more difficult than it needed to be.

Many moons ago I was putting myself through university by working as the service manager at an automotive shop.  One of our technicians, Jeff, always cheerfully described a situation where you're up against parts that don't want to move as a 'bend the fuck out of it' situation.  I'm no fan of pointless violence when it comes to mechanics, but there does come a point where you've either got to 'give 'er' (another of his favourite sayings) or give up.

Your mood when performing mechanical taks seeps into the machine.  If you're angry when you do repairs, that anger ends up in the mechanical work you're doing, which usually doesn't end well.  A Zen approach to mechanics usually creates a zen machine that doesn't emit the drama that an angry machine will.  Having said all of that, I'd pretty much emptied my swearing vocab by the time I had untangled this Triumph twin on Sunday.

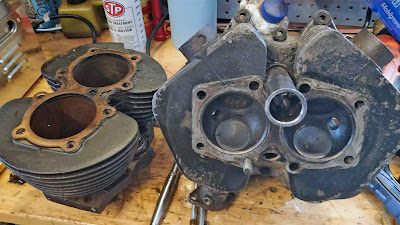
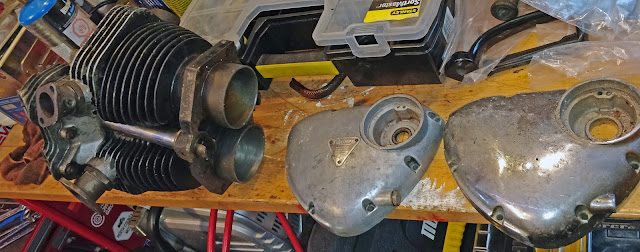
Having never worked on this kind of motor before, I was lucky enough to get a spare head and cylinder sleeve when I got the bike, so rather than go in blind I disassembled the spare unit first to see how it all went together.

I continue to enjoy working on this pre-digital, very mechanical motorbike.  While it isn't as efficient and exact as a modern bike, there is something very satisfying about getting the mechanical bits lined up so that they work together.  When it's finally running it'll feel like I've rebuilt a Swiss watch.

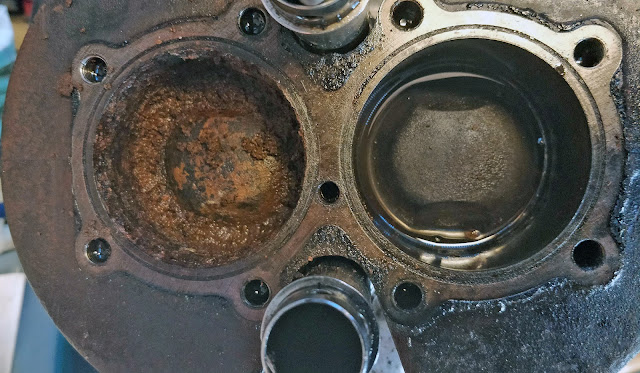
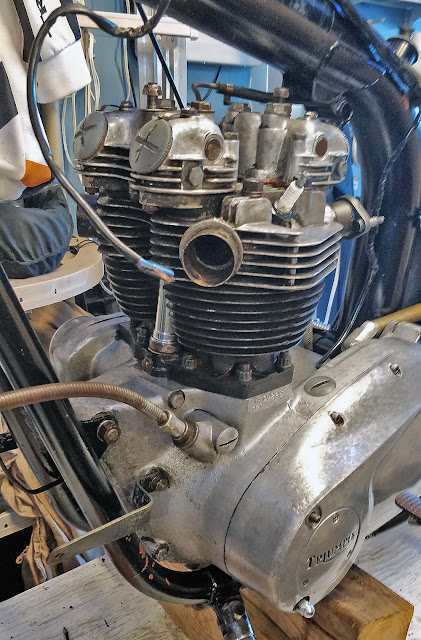
With the practice head disassembled, I began removing the head on the bike.  It came apart as my reconnaissance suggested it would and looked mechanically sound with no discolouration or obvious wear.  The bad news came as I finally got down to the head gasket.


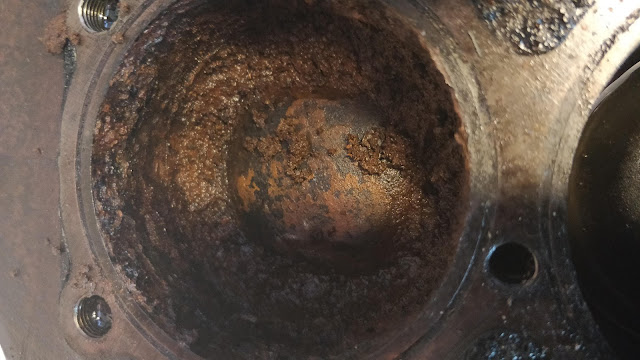
The right hand cylinder looked fantastic, but the left side was a mess with a thick layer of corrosion and an obviously seized-in-the-sleeve cylinder.  I'd expect to see something like this on a water cooled engine when the head gasket has failed allowing water and coolant into the cylinder, but this is an air cooled unit with no coolant in sight.  My best guess is someone left the spark plug out in a damp environment for an extended period of time letting moisture in to disastrous effect.  It's amazing what a bit of laziness or stupidity can be amplified into over time.

With a cylinder seized in the sleeve, I was left in a bind (see what I did there?).  I left it soaking in brake fluid overnight (I'd tried WD40 previously), but the next day it was just as stuck.  I applied heat, and then tried to lever the head off the cylinder to no effect, which led to that Jeff moment where I had to decide how far I'm willing to go to win (the answer is: all the way, in case you were wondering).


What followed was longer and longer breaker bars to apply more leverage, mixed with some applied heat from the propane torch.  What finally ended up working after a couple of hours of swearing and sweat was applying heat, inserting a long piece of wood to lever the head up while applying some focused violence to the cylinder top.  Millimetre by millimetre the cylinder sleeve eased up until the head finally came free, which was good because I was all out of swear words by that point.


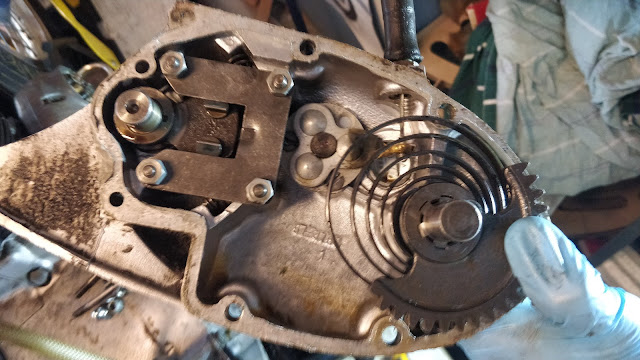
I was rewarded with a couple of nice observations once the damned thing came off.  Firstly, the bottom end moved very smoothly for a motor that hasn't spun in 30 years.  There is no play or noise in the big end as it turns.  Secondly, the kickstarter I rebuilt the other week works perfectly, engaging and spinning the motor when applied and not interfering when left, which was satisfying.

Looking at the jammed cylinder, it looks heat seized with burn marks all over the inside and physical damage up the side.  If replacements aren't crazy, I might use the spare head I've got to get things into motion, but if it's going to cost a lot to the replace these bits I think I'm looking at a more aggressive customization option:  a 750cc big-bore kit.

Dropping $1000 into a broken motor seems extreme (it is extreme), but I've had to recalibrate my what-I'm-willing-to-pay index throughout this project; vintage ain't cheap.  If it's going to cost the better part of $500 to get the motor back to stock, why not get all new parts and get an engine upgrade in the process?

Before: sleeves like that usually slide off.  Cylinders are snug but not stuck.

After: a couple of sweaty, intense hours later.  It was a satisfying win.

I've done a number of projects now where I get a sidelined bike back on the road, the most recent of which was a '97 Honda Fireblade, but I've never had to do a complete engine rebuild.  Unlike some of my more fraught earlier mechanical work on the only bike I owned that was keeping me from the far-too-short Canadian riding season, I can take my time with the Bonnie and go all the way if it needs it and I'm up for it.  The only thing producing drag is my inherent cheapness.

I'm still intent on making sure the project pays for itself.  It doesn't have to pay me for my time, this is a hobby, but when I sell a restored machine and it balances the books in terms of purchase price and parts, I find that inherently satisfying; it means my hobby is a zero-sum game.  The Bonnie currently owes me $1500 for the bike and spares and another $500 in parts so far.  Rebuilt in running shape (but customized and I'd say pretty fugly) similar Bonnies are asking $7500.  If I can mechanically restore this bike to good running order and clean it up, a $5000 budget should see me well into the black.

Now to decide how to drop the next three grand on this thing...


Some other photos from the work this past weekend:

Seized cylinder soaking in brake fluid overnight.

First look at the head gasket after getting the cylinder sleeve off.

A disappointing first look into the heart of the Triumph.

This is the head on the bike motor.  The other head must be from an earlier machine, or it's missing parts.  Those risers with bolt holes in the top were on the '71 top end but not on the other one, which looks to be an earlier unit (Triumph built the 650 twin for many years).


I get a great deal of satisfaction from cleaning up the old parts on the wheel in the shop.  This is an exhaust clamp, lovely patina!

This is the 'practice' top end on the bench.  Unlike other top ends I've been in (my 'modern' Triumph Tiger, the Fireblade, etc), this isn't an overhead cam motor.  It uses push rods to operate the valves from down below (they're dead centre in the photo).

Monday 17 January 2022

How Bespoke is Too Bespoke?

Owning a Fireblade checked a box, taught me
many things and was a zero cost experience!
I always try to balance out bike projects so that I land in the black on them.  I've gotten pretty good at this.  The Fireblade Project cost me about $2300 all in and then I got to ride it for a season before selling it for $2500, which I then put towards the Concours14.  Even with fancy seats, windshields and other gubbins, the Connie only owes me about $7000.  Older model, double the mileage bikes are going for eight grand, so I'm still ahead there too.

People who throw big money down on customization that they like seem to think other people will pay extra to adopt their choices and tastes, which never made a lot of sense to me.  This goes for houses or in vehicles - just because you're willing to pay a premium to get a certain look, doesn't mean anyone else is, and expecting them to shell out for your choices is a bit naive.


The Concours was a cagey purchase that
still has me well in the black.
What does always sell is functionality.  As much as I'd like to get all romantic and throw money at the old Triumph I'm restoring, I'm more interested in making it work, and then riding it.  To that end, I'm not interested in creating a perfect replica of a 1971 Triumph Bonneville to put in shows, so modern touches (especially when they're more cost effective than stock-at-all-cost options) are something I have no trouble with.  A bike that starts easily and runs sweetly sells itself much more quickly than a cantankerous but period correct trailer queen.  One's a motorcycle, the other is art, and art is notoriously in the eye of the beholder.

One of the reasons I've always gravitated toward cheap and cheerful 80s and 90s Japanese restos was because the parts are usually easy to find, including hard parts from a breaker if needed, and they're as cheap as chips to buy because people tended to use them rather than put them up on a pedestal.

My first brush with 'vintage' (I think a 51 year old air-cooled Triumph from before the collapse of the British bike industry qualifies as vintage) has me wondering if my approach still works.  The cost of parts is much higher than more recent Japanese bikes and this particular Bonneville was half taken apart by a muppet who wanted to be in Easy Rider, so I'm constantly finding parts missing or incorrect.  I'm also struggling with missing non-metric tools after having owned metric bikes my entire life.

When I'm reading Practical Sportbikes I enjoy the articles on DIY and the stories of scratchers who got a machine put together with their own hands.  When they run one of the 'specials' articles where it's a rich guy with clean hands throwing money at a project, I lose interest quickly.  Classic Bike Magazine is similar.  When they're talking about an owner keeping an old machine running on ingenuity and guile, I'm all in, but the minute it's a millionaire adding to his collection with another bespoke machine put together by someone else, I've lost interest.

I just finished Guy Martin's new book, Dead Men Don't Tell Tales, and Guy ends the latest one talking about trying to find what makes him happy.  This requires a fair bit of self awareness - something that most people don't have.  Guy's particularly difficult in that he will often act on an urge that turns out to be incorrect, but, as he says in the book, he's evolving.

There's a scene in Guy's Garage where Cammy, his professional race mechanic mate, knows how to fix the car they're working on but Guy has his own ideas and keeps bashing away at it wrong.  Rather than push the point, Cammy backs off and waits for Guy to realize he's using the wrong tool for the job.

Guy is critical of Cammy for being slack in his approach to work in the book, but I'm left wondering if the truth isn't somewhere in between:  what looks like a lack of effort from Guy's point of view is actually a better use of his energy from the professional race mechanic's point of view.  There's more to all this than just jumping in to the physical labour, you need to be exercising the grey matter too.

What I'm taking from this latest round of Guy Martin media is that you're more likely to stay engaged with and finish big projects if they make sense to you.  To that end, I spent yesterday working out why the kickstarter on the Bonneville wasn't working (the muppet had put it in backwards).

The goal is still to have gone through the whole bike and have it back in working order without breaking the bank.  The amount spent on it matters less than whether or not the project is in the black.  If a functional '71 Bonneville is worth about five grand, then that's what I'll work to on the budget, while keeping an eye on what engages me most about all this:  putting a sidelined bike back into service again... and then riding it!

This morning I'm looking at Motogadget's mo.Unit Blue and considering how to best tackle a 51 year old wiring loom that looks to be in good shape but should probably get rebuilt if dependability is the goal.  An ignition powered by bluetooth on a smartphone is just the kind of steampunk anachronism that a riding focused buyer would dig.  That it's also invisible means it won't hurt the look of the bike (the only change is the ignition key isn't there).
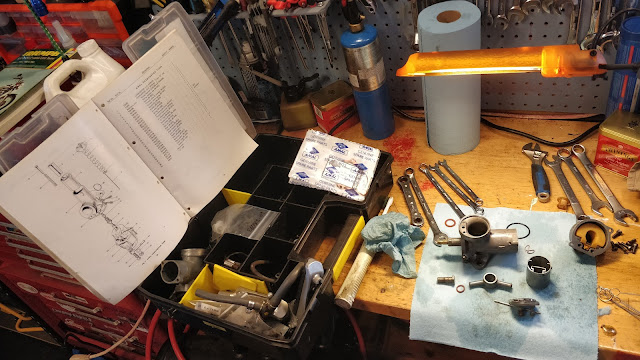
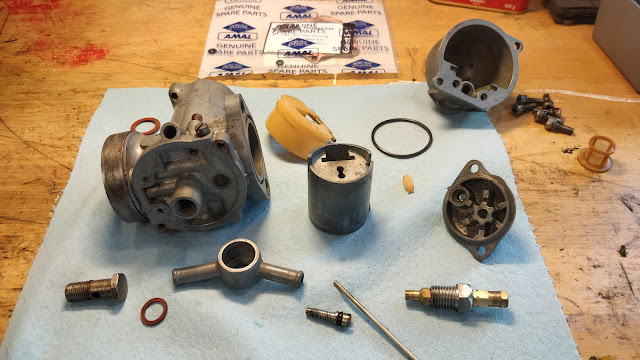
Got into rebuilding the Amal carbs only to discover the muppet who took them apart before didn't install any of the air slider hardware for the choke, so now I'm hunting for hard parts for 51 year old carbs... in a pandemic.  Note my anemic imperial socket wrench set.

Ready to go and then stopped - neither carb has the air slider or hardware in it.  I'd normally call around to the local breakers, find a donor set of carbs and then keep them handy for situations like this.  That isn't an option with a 51 year old British bike.

It's coming along - slower than I'd like, but it's coming along.  When it seems too much I remind myself why I'm doing it: one day soon that engine will turn over for the first time in decades and shortly after that I'll be out riding the thing!

Thursday 30 December 2021

Motorcycle Electrical System Rebuild From Scratch

Researched links on re-wiring the 1971 Triumph Bonneville... 

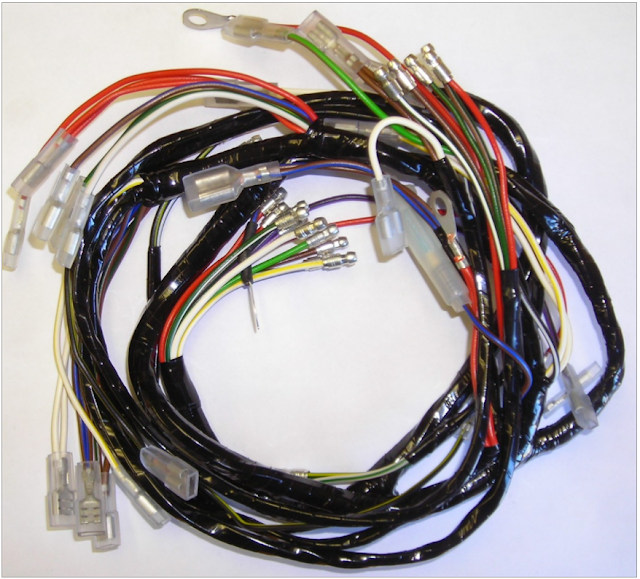
The old Bonnie has an intact loom and many of the original electrical components, but many of these pieces won't have weathered the decades well and I'd be crazy to try and rebuild a hacked on electrical system in a fifty year old bike, so it's all coming out.  I'm going to take a page from the custom scene and build a loom from scratch and design and build a complete electrical system from scratch.

This ain't no modern digital machine so the electrical system in it is prehistorically simple.  Building a dependable replacement with quality modern upgrades (proper copper wiring, modern connectors, new electronic ignition and coils, etc).  The result should be a 1971 Bonneville that is more spritely and dependable than anything that rolled off the line in Meriden in 1971.


Tutorials on creating a motorcycle wiring harness/loom:

BikeExif Tutorial: https://www.bikeexif.com/motorcycle-wiring

Rewiring tutorial:  https://www.liveabout.com/making-a-motorcycle-wiring-harness-743591

Tutorial:  https://purposebuiltmoto.com/motorcycle-electrics-101-re-wiring-your-cafe-racer/

Tutorial: https://www.hagerty.com/media/maintenance-and-tech/building-wiring-harness-from-schematic-to-bundle/

Resource (costs 20 pounds): https://rupesrewires.com/build-your-own-wiring-loom-pdf-book/

Another good resource ($40): https://www.amazon.ca/gp/product/0760345368/ref=ppx_yo_dt_b_asin_title_o06_s00?ie=UTF8&psc=1

I've purchased and read that last one - it's a gentle introduction to electrical work but I found it a bit simple and wished it had picked up speed as it went.  If you've never done any electrical work then it's a good place to start, but that's what I do all day so I was hoping for something with a bit more depth.

Replacement harness:

http://www.britishwiring.com/MC-28-PP-p/mc28pp.htm

Prebuilt '71 Bonneville wiring harness: https://www.thebonnevilleshop.com/product/lucas-71-72-triumph-bsa-650-twins-main-cloth-wiring-harness-pn-54959629-g-99-1222-g/


Original loom wiring colours:
  • RED (seems to be earth but then battery + so this is a positive earthed bike?)
  • WHITE (headlamp loom)
  • GREEN/WHITE STRIPE (LH handlebar switch & main loom)
  • BROWN/GREEN STRIPE (headlamp loom)
  • BROWN/GREEN STRIPE (headlamp loom)
  • WHITE/YELLOW STRIPE (L/H handlebar switch) + ignition coil
  • BROWN (headlamp switch)
  • GREEN/RED STRIPE (L/H handlebar switch)
  • PURPLE (horn press R/H switch)
  • LIGHT GREEN (L/H handlebar switch)
  • PURPLE/RED (earth?) horn
  • BLACK/WHITE STRIPE / BLACK/YELLOW STRIPE (contact breakers)
  • BLACK/WHITE STRIPE (condesner pack/ignition coil split)
  • RECTIFIER:  WHITE/GREEN STRIPE + GREEN/YELLOW STRIPE+BROWN/BLUE STRIPE+RED (earth)
  • IGNITION COIL: BLACK/YELLOW STRIPE to coil & condenser pack + WHITE to coil
  • RED (earth frame)
  • BROWN/BLUE: Zenor diode
  • RED to battery positive (that doesn't make much sense)
  • BROWN/BLUE: battery negative
  • IGNITION SWITCH:  WHITE+BROWN/BLUE+BROWN/GREEN
  • FLASHER UNIT:  WHITE+LIGHT GREEN
  • REAR LIGHTS:  BROWN/GREEN STRIPE (rear lamp)+BROWN (stop lamp)+GREEN/WHITE STRIPE (L/H indicator)+GREEN/RED STRIPE (R/H Indicator)+RED (earth)
  • STOP SWITCH:  BROWN+WHITE
  • STATOR (GREEN/YELLOW STRIPE+WHITE/GREEN STRIPE)
https://monomotorcycles.co.uk/ were advertised in the UK's BIKE Magazine...


The Motogadget is an all-in-one electrical block for all electrical items on a bike - it also provides you with a bluetooth connection so you could start and stop it by your smartphone:
https://www.motogadget.com/shop/en/electrics.html

Not really what I'm looking for for the Bonnie project, though I'll keep it in mind for a future ground up custom build.

A new ignition barrel with keys looks to be about $80.  I'll see if Britcycle has them.

The existing wiring looks like it was taken apart and left that way - I'm tempted to take it all out and just rewire it rather than trust the old mess.

Electrical Systems Parts List:

  • Ignition barrel & key set
  • wiring to rebuild loom step by step - I'd need correct gauge wiring & connectors
  • fuse box
  • fuses
  • reg/rectifier
  • upgraded/modernized stator


Motorcycle wiring how to: https://docs.google.com/document/d/1zm67VyrQTS1_H7WRunfkhOZ1H6wivD6RuK6194P3lvs/edit?usp=sharing  A commonly found writeup someone has done to walk any interested DIYer in how to rewire your bike.

1971 Triumph Bonneville Project: Photos from the current project and long term design ideas

 Some photos from the ongoing 1971 Triumph Bonneville winter project:


One of the boxes of spares.

Spare cylinder head and engine covers.

Looking into the top of the valves...


Yep, that's a 1984 plate sticker on it!

Front wheels cleaned up nicely.

Motor cleaned up well too!

Got it out into the minus ten sun to give it another clean up now that it's stripped.

Strance is back to stock now that the massive chopper front shocks are gone.


The goal is to get it mechanically sorted and ride it rat-bike style next summer to iron out an kinks.  Next winter it'll all come apart again and this time the frame will get painted and so will the body panels.  I've found some year correct Triumph badges but I'm thinking something a bit non-stock for the paint job, like perhaps a Gulf racing livery colour scheme:


https://www.autoevolution.com/news/gulf-racings-iconic-livery-looks-at-home-on-this-modified-yamaha-sr400-149258.html#agal_6


I'm also thinking about seats.  A plain stock seat costs the better part of $500US.  For only $100 more I could get a custom coloured Corbin seat!

https://www.corbin.com/triumph/vintlist.shtml


More research needed, but that looks sharp!  You can customize Corbin vintage seats like their modern bike seats, so I could match it to the Gulf racing colour scheme too.


Sunday 28 November 2021

1971 Triumph Bonneville Restoration: Front Fork Rebuild

It's all snow and wind outside so I spent a good six hours in the garage this weekend rebuilding the front forks and the triple tree on the '71 Bonneville winter project.


The forks on the bike had been 'choppered' with massive fork tubes and spacers in them.  The bike came with new stock fork tubes so after a cleanup both front forks got rebuilt with stock fork tubes.  I'll put the chopper ones up for sale and see if it'll make a dent in the new parts order I got in.

The internals on the forks were in good shape (it has always been stored inside).  After a cleanup they went back together again nicely.  The picture on the right gives you an idea of just how long those fork tubes were (almost as long as the whole shock!).

The right side front fork went right back in no problem, but  the left side one won't fit in the lower triple tree mount (it has a bolt that squeezes it on but the circular clamp is too tight.  I've tried heating it up and wedging a screwdriver in the gap to respread it enough to accept a fork.  I shouldn't complain, this is the only thing that's being difficult on this fifty year old machine so far.

The lower fork unit as it came out of the giant chopper tubes.

The same piece cleaned up.

Parts diagram from the '71 Triumph's parts manual.

Meanwhile, the first parts order came in from British Cycle Parts.  They were great helping me clarify what I needed to get started.  The order was about $450 including shipping and got here quickly (within a week), one box from their Canadian warehouse and the other from their U.S. one.  I haven't started installing anything yet, but I now have what I need to rebuild the Amal carbs, sort out the electrical system and take apart the motor to prep it to run for the first time.

Motor gasket set!

Electronic ignition system and coils!

Amal carburetor rebuild kits!

Rubber bits!  This time 'round I got a new kickstart rubber & the gear shift rubber.

That's a stock style new rubber to replace whatever the f*** was on it.

The monkey who was choppering the bike put massive footpegs on the rear peg position,
but that doesn't make any sense on a chopper (they're usually feet up and forward).
These are the stock footrests.

Stock foot rests (and hardware)!

The plan is to rebuild the carbs, get the motor sorted, install the upgraded ignition system (which I suspect will also involve creating a new electrical loom) and then see if I can get it all to run.  Once I've got it a step closer to running I'll be back in touch with BritCycle to get the other bits and pieces I need to get it rideable.  The plan is still to get it to a place of getting a safety and putting it on the road next season.

I'm not a big fan of lost causes and I wrench to ride, so the point is to get the Bonneville back into service. After watching a lot of Henry Cole on TV, I like the idea of a 'rat bike', which also means I can focus on the mechanics rather than how it looks.  If I can get the mechanics sorted to the point where I can ride it, I'll do a season with it rough but rideable and then consider my options.  I got the bike and spares for $1500 and I've just put another $450 into it.  I think I can get it roadworthy for under $4000 and a non-running barn find bike of similar era was going for a grand more than that a few weeks ago online, so no matter what the Bonnie project won't ever drip red.

In a perfect world I'll get it sorted and some one will offer me more than I've put into it (cost, not time, I'm happy to put time in keeping bikes on the road).  Whether that's once it's roadworthy or once it's been cleaned up too, I'm easy.  Meanwhile the Bonneville is doing what I wanted it to:  giving me an opportunity to go deep on a motorcycle restoration and learn a lot in the process.

The motor's getting cleaned up and recommissioned.

Once the (now stock) forks are back in I'll wheel it out for a deep clean on the motor
and then start with the electrics before rebuilding the carbs.  With any luck the old Bonnie
will be to the point of starting by the new year.

Somewhere in between all this deep surgery, the Concours needs new brake pads and the Tiger has some new sprockets and a chain to install.  To be honest, these minor maintenance jobs are something to look forward to after the deep diving into the restoration project.

Last winter was a deep maintenance round on the Tiger, but even that pales in comparison to the scale and scope of the Bonneville restoration.  Practical Sportsbikes and Classic Bike are both magazines focused on hands-on motorcycle mechanics and both have talked about the dreaded project stallout that can happen when it all gets too much.  I'm taking the advice of both mags and breaking this up into chunks and then solving things subsystem by subsystem.  The small wins help me feel like like the project is progressing and prevent the dreaded project-stallout from being overwhelmed by the whole thing.

On the upside, the fact that we got 15cm of snow over the weekend isn't really on my mind as I'm keeping track of many things-to-do in the garage.