Showing posts with label motorcycle electrical systems. Show all posts

Thursday 30 December 2021

Motorcycle Electrical System Rebuild From Scratch

Researched links on re-wiring the 1971 Triumph Bonneville... 

The old Bonnie has an intact loom and many of the original electrical components, but many of these pieces won't have weathered the decades well and I'd be crazy to try and rebuild a hacked on electrical system in a fifty year old bike, so it's all coming out.  I'm going to take a page from the custom scene and build a loom from scratch and design and build a complete electrical system from scratch.

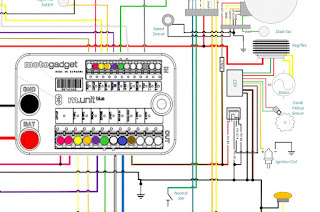
This ain't no modern digital machine so the electrical system in it is prehistorically simple.  Building a dependable replacement with quality modern upgrades (proper copper wiring, modern connectors, new electronic ignition and coils, etc).  The result should be a 1971 Bonneville that is more spritely and dependable than anything that rolled off the line in Meriden in 1971.


Tutorials on creating a motorcycle wiring harness/loom:

BikeExif Tutorial: https://www.bikeexif.com/motorcycle-wiring

Rewiring tutorial:  https://www.liveabout.com/making-a-motorcycle-wiring-harness-743591

Tutorial:  https://purposebuiltmoto.com/motorcycle-electrics-101-re-wiring-your-cafe-racer/

Tutorial: https://www.hagerty.com/media/maintenance-and-tech/building-wiring-harness-from-schematic-to-bundle/

Resource (costs 20 pounds): https://rupesrewires.com/build-your-own-wiring-loom-pdf-book/

Another good resource ($40): https://www.amazon.ca/gp/product/0760345368/ref=ppx_yo_dt_b_asin_title_o06_s00?ie=UTF8&psc=1

I've purchased and read that last one - it's a gentle introduction to electrical work but I found it a bit simple and wished it had picked up speed as it went.  If you've never done any electrical work then it's a good place to start, but that's what I do all day so I was hoping for something with a bit more depth.

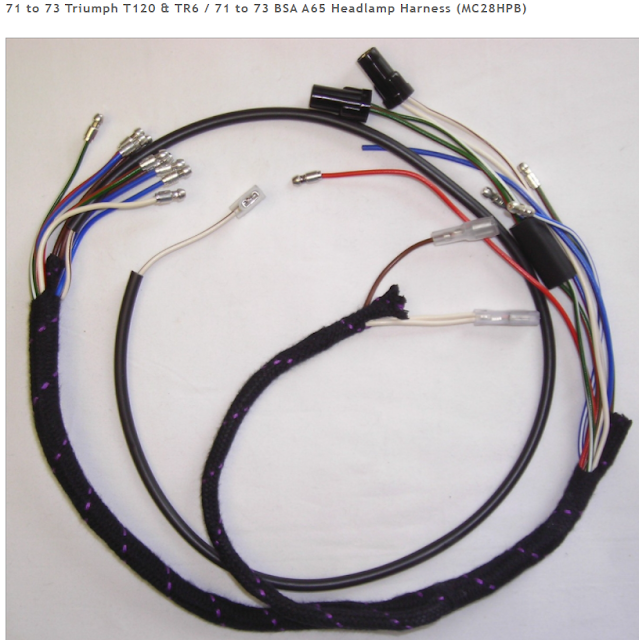
Replacement harness:

http://www.britishwiring.com/MC-28-PP-p/mc28pp.htm

Prebuilt '71 Bonneville wiring harness: https://www.thebonnevilleshop.com/product/lucas-71-72-triumph-bsa-650-twins-main-cloth-wiring-harness-pn-54959629-g-99-1222-g/


Original loom wiring colours:
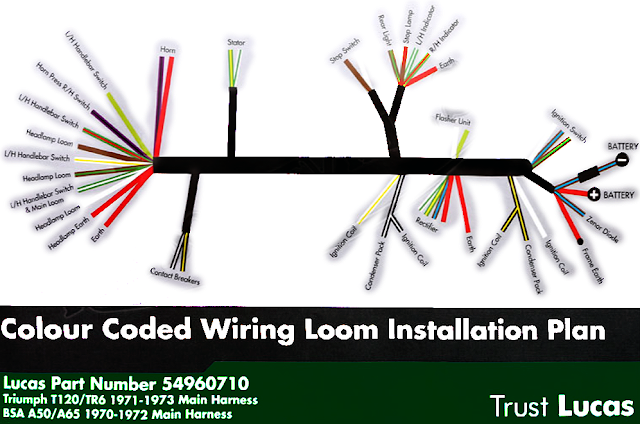
  • RED (seems to be earth but then battery + so this is a positive earthed bike?)
  • WHITE (headlamp loom)
  • GREEN/WHITE STRIPE (LH handlebar switch & main loom)
  • BROWN/GREEN STRIPE (headlamp loom)
  • BROWN/GREEN STRIPE (headlamp loom)
  • WHITE/YELLOW STRIPE (L/H handlebar switch) + ignition coil
  • BROWN (headlamp switch)
  • GREEN/RED STRIPE (L/H handlebar switch)
  • PURPLE (horn press R/H switch)
  • LIGHT GREEN (L/H handlebar switch)
  • PURPLE/RED (earth?) horn
  • BLACK/WHITE STRIPE / BLACK/YELLOW STRIPE (contact breakers)
  • BLACK/WHITE STRIPE (condesner pack/ignition coil split)
  • RECTIFIER:  WHITE/GREEN STRIPE + GREEN/YELLOW STRIPE+BROWN/BLUE STRIPE+RED (earth)
  • IGNITION COIL: BLACK/YELLOW STRIPE to coil & condenser pack + WHITE to coil
  • RED (earth frame)
  • BROWN/BLUE: Zenor diode
  • RED to battery positive (that doesn't make much sense)
  • BROWN/BLUE: battery negative
  • IGNITION SWITCH:  WHITE+BROWN/BLUE+BROWN/GREEN
  • FLASHER UNIT:  WHITE+LIGHT GREEN
  • REAR LIGHTS:  BROWN/GREEN STRIPE (rear lamp)+BROWN (stop lamp)+GREEN/WHITE STRIPE (L/H indicator)+GREEN/RED STRIPE (R/H Indicator)+RED (earth)
  • STOP SWITCH:  BROWN+WHITE
  • STATOR (GREEN/YELLOW STRIPE+WHITE/GREEN STRIPE)
https://monomotorcycles.co.uk/ were advertised in the UK's BIKE Magazine...


The Motogadget is an all-in-one electrical block for all electrical items on a bike - it also provides you with a bluetooth connection so you could start and stop it by your smartphone:
https://www.motogadget.com/shop/en/electrics.html

Not really what I'm looking for for the Bonnie project, though I'll keep it in mind for a future ground up custom build.

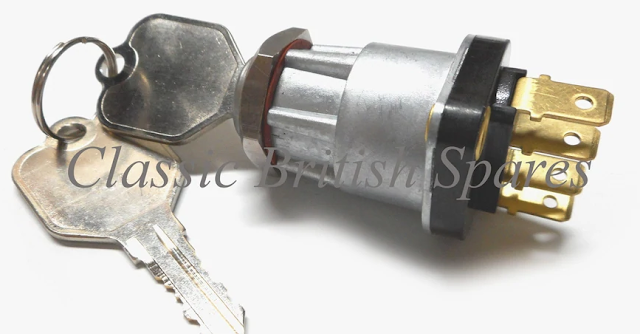
A new ignition barrel with keys looks to be about $80.  I'll see if Britcycle has them.

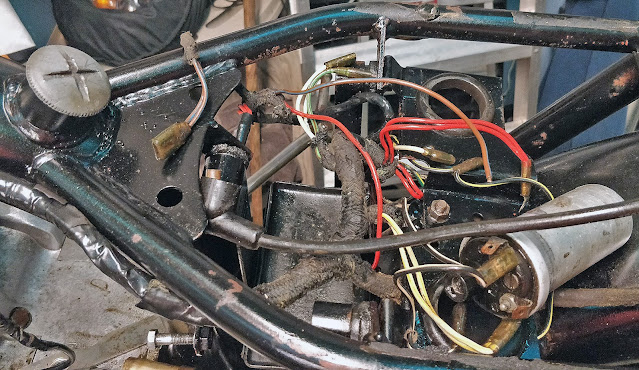
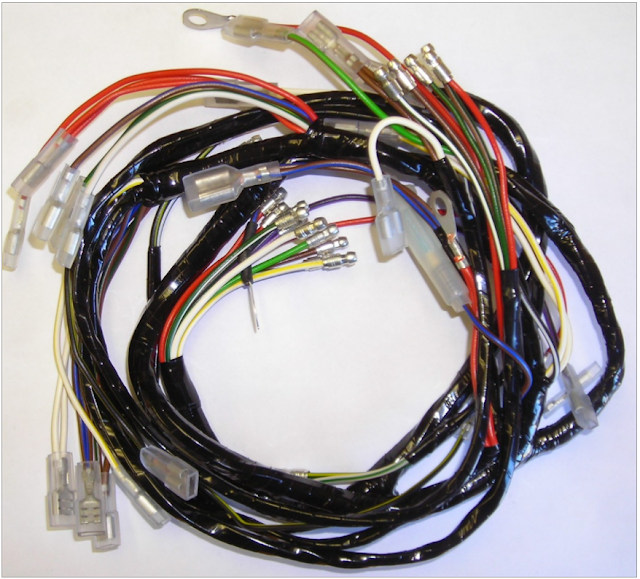
The existing wiring looks like it was taken apart and left that way - I'm tempted to take it all out and just rewire it rather than trust the old mess.

Electrical Systems Parts List:

  • Ignition barrel & key set
  • wiring to rebuild loom step by step - I'd need correct gauge wiring & connectors
  • fuse box
  • fuses
  • reg/rectifier
  • upgraded/modernized stator


Motorcycle wiring how to: https://docs.google.com/document/d/1zm67VyrQTS1_H7WRunfkhOZ1H6wivD6RuK6194P3lvs/edit?usp=sharing  A commonly found writeup someone has done to walk any interested DIYer in how to rewire your bike.

Wednesday 2 June 2021

Chasing Intermittent Tiger Stalling: Checking Motorcycle Electrical Systems

I'm starting to think the stalling issues I'm experiencing on my Triumph Tiger might be an electrical issue.  The onboard computer isn't giving me any error codes, but when I rev it the lights on dash dim a bit, which shouldn't happen.

Motorcycle electrical systems are, like many aspects of motorcycling, a simplified and often more high maintenance version of what you see in a car where the extra space and size means you can make things modular, more self contained and cheaper to rebuild.

Instead of packing everything into an alternator running off the engine via a belt, motorcycles break things up to minimize drag on their smaller engines (belt driven systems suck a log of energy out of a small motor).  A bike will typically put a generator inside the motor on the engine crank so if the motor is turning over the generator is using magnets to generate electricity from the spinning motion.  This produces alternate current but, like cars, bikes generally use direct 12v current, so they need something to change the AC to DC.

Regulator/Rectifiers not only switch your power generation from alternating to direct current but they also regulate it so your battery is receiving a steady 14.5 volts on charge.  A failing reg/rec can overcharge or undercharge your battery.

The flakiness of my situation (sometimes it works, sometimes it doesn't) suggests that this is a connection issue.  Before I start replacing parts I'm going to chase down all the connections, Dremel them clean and refasten everything properly.  If I'm still getting stalls and weird light dimming I'll test components one by one until I've isolated the flakey bit.

I teach computer technology as my day job and a flakey power supply (which also converts wall AC to in-computer DC) can produce some very unusual and difficult to track problems in a computer.  This feels like that.

There is nothing magic about how electricity works, but many people are really jumpy about it.  I've found that a rigorous, step-by-step analysis will usually uncover even the flakiest of electrical failures.  It will again here too.


RESOURCES

Analysing engine stalling in powersports motors 

How to know if your regulator/rectifier is failing

How a motorcycle electrical system works

Various motorcycle charging systems (full wave/half wave)

MOSFET regulator upgrade

The regulator/rectifier (#7) at the top is under the seat next to the battery.  I'm going to remove, clean and reinstall that.  


The big parts on a bike's charging system are astonishingly expensive!  Replacing an alternator with a quality rebuilt parts will cost you about $170CAD.  To do the rotor, stator and regulator/rectifier on the Tiger would cost me the better part of two grand Canadian!  Some of that might be old-Triumph price gouging, but it's ironic that all the online explanations describe motorcycle charging systems as built down to a price when it's clearly built up to one... on a mountain.  But there are options...