Showing posts sorted by date for query 1971 Bonneville. Sort by relevance Show all posts

Wednesday 16 March 2022

1971 Triumph Bonneville Project: Engine Out

The weather's all over the place at the beginning of March this year.  Last weekend I had both road-ready bikes out for a shakedown, this weekend we're skiing in -20°C windchill; that's the road I was riding on last week.

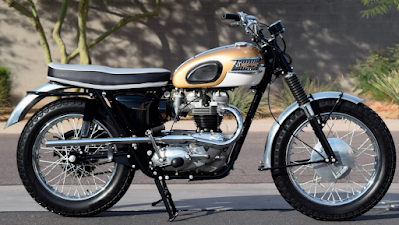
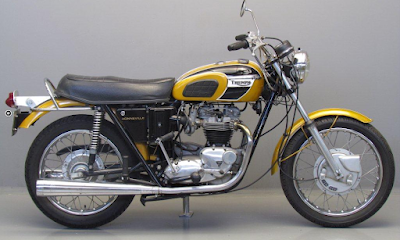
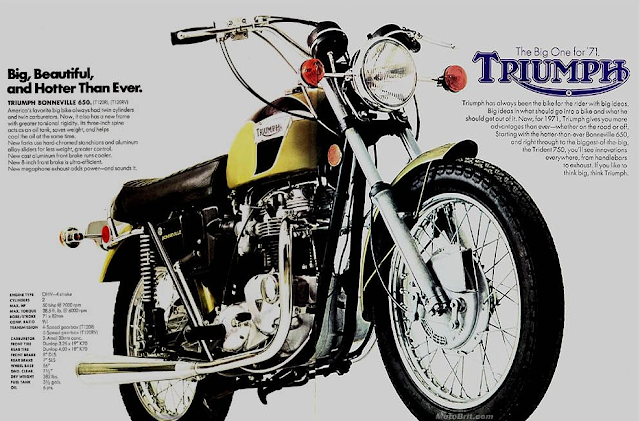
As GP from Hammy Hamster would say, 'the elephants are against us.'  With the outside trying to kill us again, I'm focusing on doing a complete tear down of the 1971 Triumph Bonneville project.  I was originally going to see if I could get the bike in motion as it is, but a combination of factors including 1971 Triumph build quality and the early 80s muppet who tried and failed to turn the bike into a chopper's spannering skills have me now approaching this as a frame up restoration.

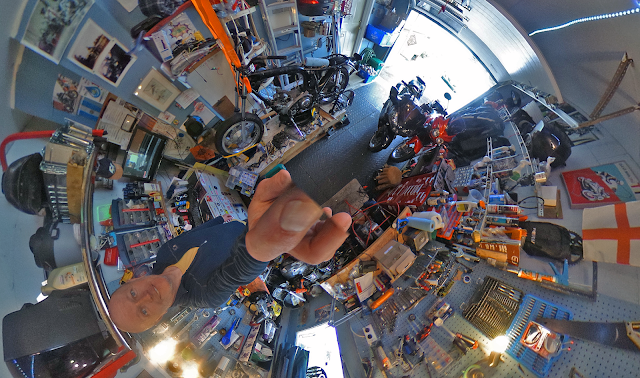
I've been working around the edges which has been good for reconnaissance in determining what state the bike is in, but now that I'm committed to doing the bike from the frame up the first job was to remove the bottom end of the motor and clear the way for a frame restoration:

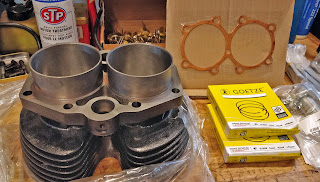
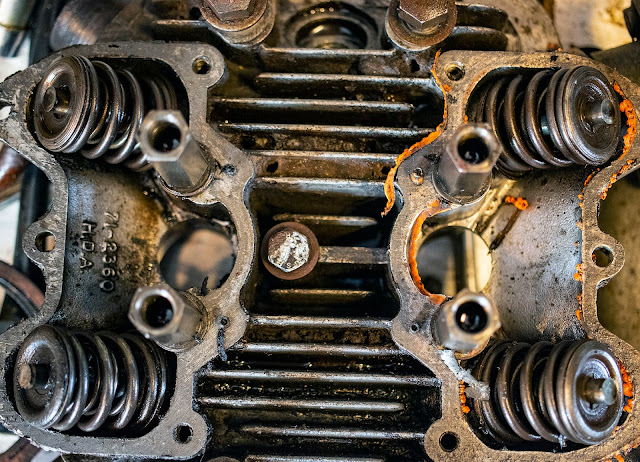
The bottom end was surprisingly light and easy to lift out of the frame and none of the frame to engine bolts caused any problems.  Some were quite loose, so a frame up resto is making more and more sense as I don't trust anything the chopper muppet did to the bike circa 1983.

It was my first time into the rear drums and, like the fronts, they were age seized but otherwise not in terrible shape, though whenever I get into the dark places on this bike it looks like a scene out of Indiana Jones.

I've left the frame on the bench as I continue to strip it of accessories.  The last time I did some coating work on a project bike it was with Fireball Coatings in Elora but seven years on they seem to have evaporated.  I've been looking for alternate (and hopefully better) options and KC Coatings in Guelph looks promising.  I intend to get in touch with them and see if we can shot blast and powder coat the Bonneville frame, I just have to make sure they can do it on a complicated oil-in-frame design like this one.  Powder coating adds thickness and can cause problems with fasteners and fitting things back together so I need to find out if KC understands that and can can work with this one so that its mechanical pieces will still fit back together.

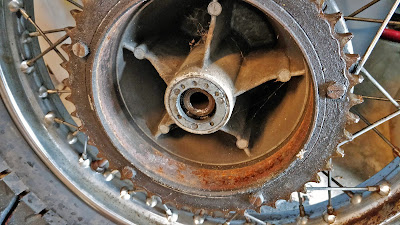
Following the frame I'll sort out both wheels (bearings, tires and inner tubes) before getting the rolling chassis back together and then rebuilding the motor with my swish new 750cc head.

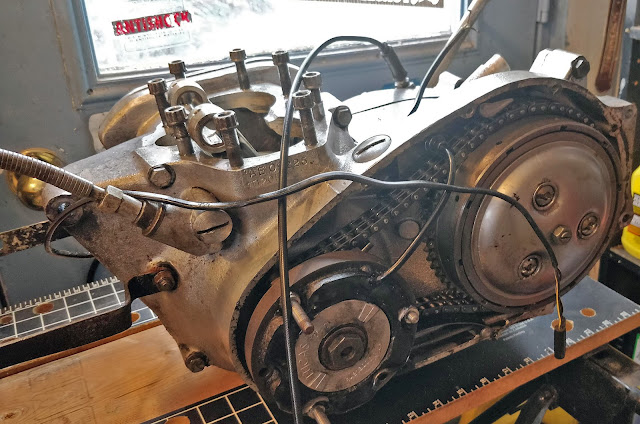
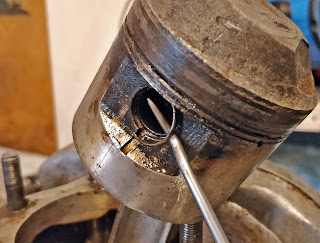
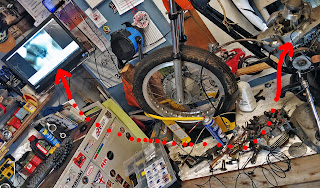
Motor out and on a pop up workbench by the window.  It's lighter than it looks.
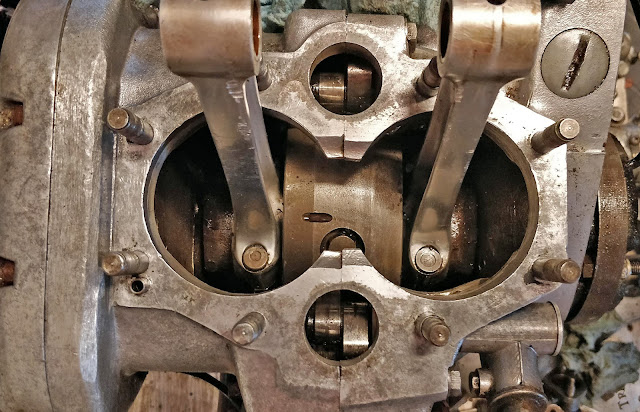
I set up the Black & Decker WorkMate by the back door to the garage to give me somewhere to work on the bottom end of the motor.  With the engine split and out of the frame, I can lift the parts off the bike around easily.  I might put the bench away and make some space while the project is in pieces.


Resources & Links


Power-coating Specialist in Guelph for the frame:

https://www.kccoatingsltd.com/contact


Where to find tires:

https://revco.ca/

Revco is fantastic at shipping (even during a pandemic) and very transparent and communicative with delivery times.  Everything I've gotten from them has been expertly packed, is new stock (no old/new tires).  They know what they're doing with motorsport tires.


How to DIY your own fender: 

https://purposebuiltmoto.com/how-to-make-a-diy-motorcycle-fender/

If I had more space I'd have welding kit and an English Wheel set up in the workshop and get into a lot more fabrication.  I'd go digital too.  A industrial sized 3d printer would make me dangerous:  https://tkmotorcyclediaries.blogspot.com/2015/11/iihtm-digital-workshop.html

1971 Oil In Frame Triumph Bonneville Restoration: Tire Choices


The old Bonneville needs new tires and inner tubes so I'm wrapping my head around olde fashioned, pre-metric motor-bike tyre sizes.

Those would be the Dunlop K70s that came with the Bonnieville back in the day.
Fortunately Dunlop is still looking after the bike they designed the tire for.


The '71 Triumph Bonneville came with 3.25 X 19″ front & 4.00 X 18″ rears and used Dunlop K70 tires as standard equipment.

It looks like there are modern Dunlop options for vintage SAE (non-metric) wheels at Revco where I've gotten my last two sets of tires.  The handy chart below shows metric and imperial conversions but after some digging I was able to find SAE/pre-metric modern Dunlop K70s that are the exact fit for the bike.  Using recent versions of original equipment that give me the benefit of modern rubber durability and grip while still keeping close to the originally engineering intent in Triumph's tire choice is fantastic.  I'm not trying to recreate riding in 1971, I'm trying to start with that technology and update where prudent for 21st Century use.


  Tire Charts                               Motorcycle Street Tire Size Conversion Charts

Metric

80/90

90/90

100/90

110/90

120/90

130/90

140/90


Alphanumeric

- NA-

MH 90

MJ 90

  ML 90

MN90/MP90/MR 90

MT 90

MU 90


Inch-(Series90)

2.75

3.00/3.25

  3.25

3.50

4.00/4.25

5.0

- NA-


Inch-(Series82)

- NA-

- NA-

3.60

4.10

4.25/82/4.40

5.10

- NA-


Front Tires:

Metric

80/90

90/90

100/90

110/90

120/80

120/90

130/90

Alpha

MH90

MJ90

MM90

MN90

- NA-

MR90

MT90

Inch

2.50/2.75

2.75/3.00

3.25/3.50

3.75/4.00

4.25/4.50

4.25/4.50

5.00/5.10


Rear Tires:

Metric

110/90

120/90

130/80

130/90

140/80

140/90

150/80

150/90

160/80

180/55

200/60

230/50

Alpha

MP85

MR90

- NA-

MT90

- NA-

MU90

MV85

MV85

- NA-

- NA-

- NA-

- NA-

Inch

4.50/4.75

4.50/4.75

5.00/5.10

5.00/5.10

5.50/6.00

5.50/6.00

6.00/6.25

6.00/6.25

6.80/7.00

7.00/7.25

7.90/8.00

9.50


Size

120/80V16

130/90H16

130/90V16

500S16

MT90H16 3.00

130/90H16 3.00

140/90H16

140/80VB16

140/90H16

150/80V16

160/80H16

160/80H16

200/60VB16

120/80V18

120/90V18

120/90H16

130/80V18

130/70VB18

150/70VB18

140/70V18

170/60VB18

180/55VB18

230/50 X 15

Rim

2.75

3.00

3.00

3.00

3.00

3.00

3.50

3.50

3.50

3.50

4.00

4.00

5.50

2.75

2.75

2.75

3.00

3.50

4.00

4.00

4.50

5.50

7.00 to 8.00

Overall Width

4.7

5.00

5.2

5.2

5.3

5.4

5.8

5.9

6.0

6.2

6.4

6.8

7.9

4.8

4.8

4.9

5.2

5.4

5.9

6.1

6.9

7.0

9.5

Overall Diameter

23.8

25.4

25.0

26.4

25.3

25.6

25.6

24.8

25.8

25.4

26.1

26.1

25.9

25.9

26.4

26.3

26.3

25.4

26.2

25.7

26.0

26.3

25.3

Note: Measurements are based on the given rim widths. A rough rule of thumb: Each additional 1/2-inch of rim width will be approximately 1/4-inch more in each tire width.


The K70s at Revco are just over a hundred bucks a pop and Counteract Balance Beaded inner tubes are actually cheaper than name brand plain old rubber inner tubes. I've been using the Counteract beads for years to great effect so they'd be my first choice even if they weren't cheaper. All in I'm looking at about $320CAN ($250USD) for new rubber for this vintage restoration project, which considering the price of some of the other parts is pretty reasonable.

In order to rebuild the wheels I'll need to replace the bearings and clean up the brakes before putting new pads and hydraulic brake cylinders back in them. All that and getting the frame sorted out will get me back to a correct rolling chassis ready for the upgraded engine.

Somewhere at the end of all of this will be a road worthy '71 Triumph Bonneville, but it's a lot of parts to find and get in and then a lot time in the garage to get there. I'm hoping it'll be on the road for next year's riding season.  As we thaw out here in Canada I'll be out on the Tiger and GTR and not spannering so much.

Meanwhile, here are some more motorcycle tire sizing reference charts found on the interwebs:


Tuesday 8 March 2022

1971 Triumph Bonneville Restoration: Gudgeons, Johnson Rods & Cylinders out! (oh my)

I've got a degree in English, but working on the old Bonneville is stressing out even my vocabulary:

That'd be your gudgeon pin right there.

Gudgeon: one who will bite at any bait or swallow anything, credulous or gullible person Mer. V. I. i. 102.  (that might apply to this project)

Definition of gudgeon
1: PIVOT sense 1, JOURNAL  (we're getting closer)
2: a socket for a rudder pintle (a rudder pintle?)

Definition of gudgeon pin: WRIST PIN

Definition of wrist pin: a stud or pin that forms a journal (as in a crosshead) for a connecting rod (that's it!)

They can make up anything! Nobody knows!  Well, you need a new Johnson Rod in here!
A few people know, George.  Consumer ignorance is expensive, but who has time
to understand the machines they depend on?


Gudgeon pins?  After the massive fight that was removing the seized cylinder head, I was bracing for misery, but I was able to pop the circlips (!) out and tap the gudgeon pins (!) through with no sweating and swearing.  Pink Floyd was playing on the computer and I think music from its era calms the old Bonneville down when I'm working on it.

The circlips popped out easily and a 3/8 inch socket extension was the perfect size to tap out the 'wrist' pins.  I thought the one on the seized side might cause more problems because it had been stuck in place with moisture but it didn't and both came out easily leaving a motor bereft of its pistons.


British Cycle Supply Co. delivered my 750cc kit quickly and without any headaches (and also for about $200 less than comparable kits out of the USA), so I got the shiny new bits out and had a look:


You'd think a 750cc head would look significantly different to the stock 650cc unit, but you have to look closely to see a difference in size.

I had a close look at the connecting rods and they appear to be in good shape and the bottom end of the motor moves freely.  I think next steps are to remove the rest of the engine from the frame, give the oil-in-frame a deep clean and then recoat it with some quality paint.  With the frame cleaned up and sorted I'll strip the rest of the motor and clean everything out to ensure nothing's whacky before I begin the great rebuild.

I could just chuck it all back together now and hope for the best, but if it ends up having other niggles rushing things at this point is just false economy.  I'm not worried about making the bike look mint, but I do want it to be dependable and that wouldn't be the case if I haven't checked it over completely after such a long (30 year?) layoff.  An engine out deep restoration was always the intention here and I'm not in any kind of rush since the other two bikes are both five by five and felt fantastic on their first rides of the year this past weekend.

The gudgeon pin itself looks to be in good shape, which is good because the head kit didn't come with new ones.  The circlips came out nicely too but the kit did come with those.  It amazes me that even specialized material like that in these cylinders can withstand the extreme forces they operate in.  This Bonnie had done at least twenty thousand miles on these cylinders and they're still in remarkable shape considering they were face to face with more than 17 controlled explosions every second (a spark plug typically fires about 17 times per second at 2000rpm!).  You'd think all that heat and violence would cause more wear than I'm seeing in the beating heart of this motor.


This is the 3/8 inch socket extension I used to tap the gudgeon pins out.  Nothing grabbed or slowed the process down and I barely had to apply any pressure.  I might have even been able to push them out had I been so inclined.  
I caught the pin as it came loose and the cylinder lifted off the connecting rods easily.  Again, considering the extreme conditions the heart of every engine operates under, I'm impressed by the engineering and metallurgy that makes all this possible.


The new cylinders don't have the carbon build up from all those combustion cycles and look pretty spectacular in their pristine newness:


Here's the whole kit from British Cycle Supply.  It includes the cylinder head, cylinders, piston rings, circlips for the gudgeon pins and a head gasket.  I swiped the last one they had in stock for $688.75CAD ($535USD - told you I got a good deal).  Unfortunately I might be the last person on the planet to get a 750cc kit that cheap.  Prices will be going up on the new stock and probably even higher than that as we're in an inflationary spiral thanks to Putin overreaching and years of pandemic fueled broken supply chains; we live in interesting times.

Another tool came in that's interesting.  I was reading Practical Sportsbikes last week (highly recommended if you love bikes and getting your hands dirty on them), and editor Chris mentioned an endoscope smartphone camera he was using on a project bike to inspect the internal parts of an engine.  I found one on Amazon for under $40CAD and it came in on the weekend.  It lets you see parts of the engine that haven't seen light before.  It's an exciting thing that offers you a look into the secret life of engines.  I'm looking forward to using it as i continue to work on the Bonnie.

Through an inspection hole inside the engine - it's disco in there!

That look on my face after the first ride in a long, long time.

The 12 year old Kawasaki (left) and the 19 year old (!) Tiger (right) were keen to turn a wheel after a long hibernation.

Bison were out bisoning at Black Power Bison Co. when I was out for a ride in balmy 6°C March Sunday.


Saturday 19 February 2022

650cc Air Cooled Triumph Bonneville Exhaust and Seat Options

More 1971 Triumph Bonneville restoration project research (all prices courtesy of BritCycle):

High pipes:

721-T74X exhaust pipes - $304.51/pair.
711-709669/9670 mufflers - $486.00/pair.
2x 742-158 clamps - $16.61 ea.
70-9673 “H” connector - $72.28.
2x 742-112 clamps - $16.61 ea.
TOTAL:  $930

Plus associated bracketry and hardware, etc if needed. The one item we’ll have difficulty sourcing will be the ‘chip basket’ heatshield; our manufacturer of those long since retired.


Looking like Steve McQueen on a scrambler styled Bonneville costs extra!  Britcycle said they might have some scratched and dented options on sale, but those aren't regular stock (obviously).


Stock(ish) exhaust system:

721-T79 exhaust pipes - $289.02/pair.
712-102 Dunstall decibel replica mufflers - $330.32/pair.
70-9888 balance tube - $29.09.
2x 742-138 clamps - $16.61 ea.
TOTAL:  $683


What I'd really like to do is form my own pipes, but I don't have the space, equipment or time to do that.  For this project I think I'll use it as a learning process and get this particular Bonneville cleaned up and mechanically sorted and leave the radical customizations to a future time when I'm loaded, have lots of free time and a much bigger workshop with a full range of tooling in it.

I think stock is the way I'll go on exhausts...

As far as seats go, BritCycle has just the sort of thing I'm looking for: 


The only thing that might knock it out of contention is if, price and fit-wise, Corbin's customizable seat is in the ballpark.  It says they might fit a '71 but they're mainly for '72 Triumph twins and up.


Quality (made in England) newly manufactured seats specific to the oil in frame 650 twins run at about $500US ($612CAD) - I'm not sure what Britcycle's go for.  The customizable (and probably higher quality) Corbin is $618US ($788CAD).  There are cheaper options manufactured in India & China to less exacting standards to consider too.  I'll be keeping that all in mind as I juggle seat options and make a decision.

Friday 18 February 2022

Old Bikes Tell A Story

I took the big SLR into the shop for some closeups.  These are photos from the 1971 Triumph Bonneville T120 project currently in process.

Call it patina, or scars, but the years on an old bike tell a story...

The 'spare' cylinder sleeves after some clean up.


Orange was the colour of panic in the early 80s.  The cylinder head was covered in this stuff in an attempt to seal a leaky motor during the aborted chopper phase of this bike's life.

That's the motor stamping (from Jan-Feb 1971).

Lucas! The Prince of Darkness™


My kind of still life.


Patina that tells a tale.