Showing posts sorted by date for query track. Sort by relevance Show all posts

Sunday, 19 January 2025

Kawasaki Concours C14 1400GTR Valve Check Part 2.1 - checking clearances

 I put together a page with the details I've gleaned from COG's documentation and the shop manual to keep track of my measurements. I've got two sets of feeler guages because I'm suspicious like that and always want a second opinion. It's particularly important in this case because having to go back in there again if a mistake is made isn't (at all) what I want to do.


With cylinder one top dead centre (TDC) and the cams both pointing out to offer access for the guages, I had a go at number one cylinder yesterday.

Cams up and out on cylinder one (left side of motor) - it took me a few turns of the engine to get it lined up right and start getting good measurements. It doesn't hurt to do this two or three times so you're sure the came is at maximum gap and you're getting good numbers.

This cover on the lower right side of the engine is removed with 8mm bolts. It's a 17mm M8 that you throw a big rachet on and turn the engine. Direction of travel is noted on the timing wheel as are marks for TDC for cylinders 1 and 4. You can do half the valves with C1 TDC and the other half with C4 TDC.

Cam timing cover came off with minimal fuss and just a drop of oil.

My suspicion of cheaply made tools causes me to have backups. In this case the tappered ones are metric first and offer a finer degree between fits.

I'll do the rest today. As many said it would be, Cylinder one appears tight. Exhaust valves should have between 0.19-0.24mm of clearance. I can just get a 0.18 in there and the 0.203 wouldn't fit in either cylinder one or two's exhaust valves.


Ran the propane heater for 20 minutes before getting started. Made for a much more comfrotable experience.

Keeping things in order - the valve cover bolts numbered and in their 'custom' holder.
 

With the forray into 'vintage' motorcycles last year my sockets were muddied with imperial and whitworth bits. They've been relegated to a lower drawer. I think I'm sticking with metric bikes for the forseable future. If I take another dive into vintage it'll be when I'm retired and have the time to navigate all the complexities. 

Tuesday, 31 December 2024

Kawasaki C14 Concours / 1400GTR Valve Clearance Research & Resources


Research

Concours 14 parts: https://www.kawasaki.com/en-us/owner-center/parts/2010/ZG1400CAF

Fuel tank sits on the frame:


Cylinder cover parts and diagram. Isn't that fantastically complicated?


The battery box slots into the side of the frame. Not sure if I have to remove it to get to the cylinder head. Honestly, with that much frame around it, how on earth do you get into the valve cover at all?


Airbox diagram: it slots into the frame on the other side from the battery. Again, not sure if that all has to come out.


Based on what I'm seeing here I need to take a lot of photos as I dismantle and keep everything on a clean sheet in order next to the bike so I have a chance of getting it all back together again. Organization will be key!

***

Hints at problems with sealing the new gasket? https://forum.concours.org/index.php?threads/valve-cover-gasket.53892/

Murph's Kits parts: https://murphskits.com/c14-valve-adjustment-kit-1/ promises to provide all the bits you need (that the dealer parts counter guy won't bother to tell you about):

Oil leaks become an issue unless you replace all the o-rings as well as including a new gasket? Might as well change the spark plugs and fuel filter while in there.  Ends up being $338 (CAD) for all of it, plus another forty bucks in shipping - still much cheaper than parts from the local dealer and with helpful additions so I'm not left with a leaky mess. I've got Murph's Kit bits all over the C14 and trust them. The set is ordered.

***

Good list of parts numbers for C14: https://zggtr.org/index.php?topic=1650.0


2010 C14 Service manual - 99924-1431-01

AIR FILTERS
Air Filter Element - 11013-0014
BMC Air Filter - 466/04
K&N Air Filter - KA-1406

Fuel
Fuel Pump filter/strainer/whatever 49019-0013. From a 2013 Kawasaki 750 side-by-side (not sure what they are calling it).
Fuel Pump O-ring - 670E5075
Fuel pump (fuel pump housing would need to be disassembled) http://www.fuelpumpfactory.com/Kawasaki-fuel-pump-Concours-14-s/6323.htm

WASHERS & Push Rivets
Final Drive Crush Washer - 92022-1086
Final Drive O-Ring for Filler Cap - 92025-1735
Oil Drain Plug Crush Washer - 92065-097
Water pump coolant drain crush washer - 92200-0498 Adept Power Sports

Fairing screw nylon washers:
5.3mm ID X 11.5mm OD X .5mm thick - 92200-0006
10.4mm ID X 19mm OD X .5mm thick - 92200-0157

Windshield mounting screw nylon washers:
10.3mm ID X 17mm OD X 1.0mm thick - 92200-0380
Nylon Push Rivet (two sizes) - 92039-0051 & 99039-0051
Push rivet under the windscreen - 92039-0048
Motosport.com Bolt Brand 6mm Nylon Push Rivet - 2005-6RIV (These may not work)
Balkamp part number 665-1446 (pkg of 9) available at NAPA for (rivet 92039-0051)
Hillman push-in Nylon Rivet - 1/4 inch H#881216 (Lowes) barcode 0823671607, for the top of dash
Grainger http://www.grainger.com/Grainger/Push-In-Rivet-5MUF8 (not sure if these fit)
Amazon http://www.amazon.com/Tusk-Kawasaki-Suzuki-Fender-Rivets/dp/B0039LEU0I (not sure if these fit)


MC OIL FILTERS Designed for the bike
Kawasaki 16097-0004
K&N KN-303
Mobil1 M1MC-134 (crosses to a K&N KN-303)
Hiflofiltro HF303/303C
Amsoil EaOM103
Emgo 10-82222
Fram PH6017A
Parts Unlimited 010035X

Oil Filters others use (other than OEM fitment - use at own risk)
A/C Delco - PF2135
Amsoil - 24942 (I think this is a Wix filter)
Napa Gold - 1358
Napa - PS1358 (black and costs less)
Purolator ML16817 (made for MC, not sure if it fits our bikes)
Purolator Pure One - PL14610 (Note: The Purolator website does not recommend using cage filters on MCs)
Purolator Pure One - 2.5"- PL14612 (Note: The Purolator website does not recommend using cage filters on MCs)
Wix - short: 51358; long: 51356
Champion 7317 (same as SuperTech)
Mobil 1 M1-110

BULBS
Tail License Plate Bulb - 92069-1055, 5007, R5W (5 watt)
Front/ Rear Turn Signal Bulbs - 92069-1125
Turn signal bulbs are 7507A bulbs (BAU15s base)
Headlight Bulb 12V-60/55W - 92069-1002 (standard H4)
Small headlight Bulb 12V/5W - 92069-1016
City lights are either a 2825 (5w) or a 2886 (6w)
City lights (LED, inverted cone, white) 194 or 168

Switches
SPST Waterproof Miniature Rocker Switch (On-Off) 16A Green 12V (also available in red) .921" Long x .685" Wide x .551" Deep Part Number: NTE-54-204W $5.40 each https://shop.vetcosurplus.com/

TIRES/Wheels
Front Tire Size - 120/70ZR17
Rear Tire Size - 190/50ZR17
Front bearing seal (08/09) 92049-0050
Rear bearing seal (08/09) 92049-1061
Wheel Bearings (F) - 6005UU oem, or 6005 2RS1 or 6005 2RSH (SKF replacement numbers)
Wheel Bearings (R) - 6304UUC3 oem, or 6304 2RS1 or 6304 2RSH (SKF replacement) the "C3" designation is a standard for precision, SKF bearings are normally C3 unless specified otherwise...
Rear Wheel Bearing All Balls - 25-1353 (Comes with one seal - you need one kit - it has two bearings)
90 Degree retrofit valve stems for the original tire sensors: Honda part VALVE ASSY., RIM 42755-MCA-R31 2014 Goldwing

Steering
Steering Stem Bearings - All Balls Racing -Tapered roller bearing and seal kit for steering stem (steering head) C-14
Part No. 22-1039 Cost: $47.95 http://www.allballsracing.com/

BRAKE STUFF
Front pad Assembly - 43082-0071 (2 EA) (08-09)
Front pad Assembly - 43082-0112 (2 EA) (2010)
Rear pad Assembly - 43082-0055 (1 EA)
Rear brake pads - EBC FA254 (Kevlar) or FA254HH (Sintered)
Front brake pads - EBC FA417/4HH (Sintered)
Front pads - Ferodo FDB2220ST (mcstuff.com p/n 454-1071, requires two sets)
Rear pads - Ferodo FDB2111P (p/n 454-2682) (evidence is these don't last as long or bite as well as other brands)
Carbone Lorraine - 1177SBK5 (front x 2), 2813RX rear
Front ABS brake line - Galfer SS FK003D625-3
Caliper rebuild kits - https://brakecrafters.com/product/caliper-seal-kit-bcnr0036/

Engine Parts
Spark Plugs - CR9EIA replaced by CR9EIA-9, gap .036 IRIDIUM!
Valve cover gasket - 11061-0263
Pulsing Cover gasket - 92055-0086
Oil pan drain bolt - 92066-0079
Oil pan drain bolt with magnet - MP-01, MP-11 for the rear drive http://www.magneticdrainplug.com
Manual Cam Chain Tensioner APE KTZx14
(NOTE: This replaces the self adjusting cam chain tensioner and eliminates the 'startup rattle'. Downside is that you will have to keep an ear out on the adjustment. There is no track record on how long the adjustment holds. USE THIS AT YOUR OWN RISK! )

Replacement Exhaust Header Nuts - McMaster-Carr 93795A230 M8.0 Oval Locknut. Use with stainless steel washers.
Fuji-lok nuts for the Exhaust Header - Use with stainless washers
Note: the '10 manual specs 13ft/lbs for torque. This should apply to the other manuals as well.
Oil filler cap - 16115-1009 (note: Fits the rear drive as well)

Tools
Oil filter wrench - 57001-1249
Pennzoil oil filter wrench 2"-3 3/4" 51mm to 95mm
JIS +2 Driver (for the 'flies) http://www.ikaswebshop.com/hodjis2dr12s.html
15mm drag link tool for rear drive filler plug http://search.harborfreight.com/cpisearch/web/search.do?keyword=drag+link
Stem nut socket from CycleDude
Steering stem top nut - 12mm hex 79.7ft lbs torque
Front wheel removal - 13/16" spark plug socket, reversed
Rear Axle - 27mm socket for the large nut, 14mm hex wrench for the left side

Final Drive
Filler cap o-ring - 92055-049 (31mm)

Swing arm
OEM Left hand side torque arm bolt is 10x63mm with part number 92153B (used to be 92153A)
OEM Right hand side torque arm bolt is 10x67mm with part number 92153C (used to be 92153A)
The flanged lock nut part number is the same for both bolts 10mm diameter nut with part number 92210B

Electrical
Battery for FOBs - CR2025 3v (watch battery)
Battery for TPS - CR2032L/F1N http://www.digikey.com/product-search/en?x=0&y=0&lang=en&site=us&KeyWords=P668-ND
Other sources for TPS batteries https://octopart.com/cr-2032%2Fvcn-panasonic-19088802
Or P660-ND check both of them out on digikey's site.

12V bike battery sources
Stock battery FTZ14-BS Furakawa - dealer sourced most likely (expensive)
AGM MBTX12U 14AH by MotoBatt (I have this and it's working fine, no issues)
Shorai battery LFX21A6-BS12 Tender SHO-BMS01
Battery Stuff http://www.batterystuff.com/powersports-batteries/sYTX14-BS.html

Bodywork
Left side cowling parts 39156-031, 033, 034, 0371, 0395
Battery cover stud rubber grommet - Frame fittings, p/n 92075-1011, damper

Levers
Brake - ASV BRC511
Clutch - ASV BRC511

Key Blanks
Key Blank - ILCO KW14R Warning, this may only work for the 08 model locks and there appears to be two types of keys in use. The KW14R only works with one of them. If your key starts with an A it will be a "Silca KW14R" keyblank. If it starts with a B it will be an "Silca KW14" keyblank.
Works ok on the bags but you will need to not insert it the whole way for the seat as it doesn't have the stop the Kawi key does. http://www.mysecuritypro.com/index.asp?PageAction=VIEWPROD&ProdID=663
Ron Ayers has new Oven Knob keys. A and B style key. If you look at your key in the fob it will have a number that starts with either A or B.
27008-0050 Style A
27008-0051 Style B

TPMS sensor part numbers
US bikes 315 Mhz (green). Note that EUR, AU, SEA use 434Mhz sensors (blue). MY (have no clue what MY stands for) sensors 315Mhz (red)
2008-2013 21176-0125
2014-2015 21176-0748

Sunday, 2 June 2024

Eleven Years, Over a Million Page Views

I started writing this when I got my motorcycle license in my early forties. The first post was in March of 2013 when I decided to get my learner's permit. From there I've tried to (as honestly as I can) describe my motorcycling experience. In that time I've gone through a bewildering array of bikes as I've figured out how I was going to enjoy this hobby. I noticed that the blog has just passed a million views (and messed up the odometer styled page counter), so thought it time for a review. Where have I wandered in the past 11 years of motorcycling? It all began with my Mum's passing and an opportunity to ride without panicking those around me.

The First '07 Ninja 650 seemed like a logical starting bike. From there I got my first fixer-upper in the form of a '94 Kawasaki C10 Concours. Getting that out of a hedge, sorting it out and putting lots of miles on it felt like a big win, but I was still learning and when the carbs went on me, I lost the plot with it. That's one of those 'Costanza moments' when I wish I could have a do-over - I've got the tools and knowhow now to sort them out!

The KLE dual sport was too small for me (couldn't get me to 100kms/hr which is dangerous on our increasingly crowded and impatient local roads), so it came and went. I also dabbled with an old Yamaha XS1100, but never got it road worthy so it doesn't make the list. Then there was the PW80 I got for Max which he wanted nothing to with, so it came and went. Neither of them cost me anything (I broke even on both) so, whatever.

With the Concours acting up and a dead Midnight Special in the garage, I was prompted into the '03 Triumph Tiger, which has been my longest serving machine (currently at 8 years and over 40,000kms travelled). The Tiger filled the gap for a long time and let me drop both the Yamaha and the Kawasaki. While the Tiger performed regular riding duty I came across a Honda Fireblade that had been sidelined for several years, got it for a song, fixed it up, rode it for a season and then sold it on for a small profit, which felt like a win.

During the early days of COVID the Tiger started acting up and I came across a 2010 Kawasaki GTR1400/Concours 14 for sale with low miles that had also been sidelined in a shed. I sorted out this complex bike and once again felt like my mechanicking skills had levelled up. With some extra contract work I'd done and the money from the Fireblade this step up to something more expensive didn't eat into savings.

The C14 and Tiger are both still currently in the garage. In 2021, as COVID lingered, I came across an opportunity to try a vintage restoration. I had a choice of several bikes and took one that was the furthest gone, which in retrospect was a mistake (don't get cocky, right?). I cleaned up this ratty old chopped 1971 Bonneville and got to the point where it sat in the corner of the garage because I'm too stingy to throw money at it. Lesson learned: if you want to go vintage, be prepared to pay through the nose for it and wait a lot for parts availability.

I let the Bonneville go this spring for what I paid for it (minus the new parts). It was a loss but it gave me something to do while the world stopped and I learned a lot. It was fun doing an archeological inspection of a machine that was almost as old as I am.


What's next? I've never owned a new bike before. Following my shear perversity in terms of motorcycling, I'm tempted by a Moto Guzzi V85 TT. Partly because of the character, partly because I think they're stunning and partly because it's so not everyone else.


I noticed the other day that the blog has passed a million page views. It took since March of 2013 (when I started riding) to pull it off, so that's just over 11 years, but a million is a bigger number than most people can conceive. Over the 4083 days this blog has been up it has averaged over 250 page views every day, which feels good. It provides information for people looking for details on some of the mechanics I've tackled, and it also gets good pickup on travel stories and bike tech. I'm hoping more travel stories are in the future.

Another story that popped up recently was the ride around Vancouver Island ten years ago. That would be the first time I rented a bike while away from home. It led to the Island Escape story in Motorcycle Mojo. What isn't mentioned there is that prior to my wife's conference we also rented scooters and went for an adventure to Butchart Gardens in Victoria.


More travel opportunities like that, or Max and I's ride through the Superstition Mountains in Arizona, or down to the Indianapolis MotoGP race would be fantastic, it's difficult to find the time though.

The other day I thought I'd get into the throttle controls on the Tiger and clean and lubricate all the bits (if you read this regularly you can guess where this is going). Everything plastic on this 21 year old bike is brittle and yep, the throttle cable adjuster broke. I've jury-rigged a solution, but like everything else on this bike, finding parts is becoming 'vintage difficult and expensive', even though it's anything but.

My biking decisions might be made for me if we decide to move. If we downsize into a condo or something without a garage I'd be tempted to clear the deck and get something new. At that point having something that someone else has to work on while it's under warranty would make sense. I don't know how long I'd be happy with no working space, but perhaps I'd end up getting in with a shop coop and having some space in a shared garage somewhere. My approach to motorcycling is quite isolating. A change in circumstances might be a good thing.

If every time I touch the Tiger to do maintenance (it needs regular TLC) the parts crumble in my hands, I don't know how much longer I can keep it going. I'd really like to get it to six figures but beyond that I'm not sure - perhaps turn it into modern art?

I'm still also keen to pursue trials riding and perhaps long distance enduro with an eye for finishing rather than beating up machinery to attain top speeds. I'd do track days but I live in Ontario, which doesn't make access to things like track days easy in a any way. Likewise with the off roading. It's about, but it's sporadic and they make it as difficult as possible. Living somewhere else might open up motorcycling opportunities that feel out of reach here in the overcrowded world of South Western Ontario.

Sunday, 5 December 2021

Motorcycling For Sport On a Budget

LOGISTICS

The trickiest part about trying to arrange your motorcycling to provide you with a sporting outlet are the logistics.  You can't ride a track/trials/dirt bike to where you're going to ride it in a sporting fashion, so you need transportation options that'll get you and your gear to where you intend to use it.

The obvious choice (if you're looking for a budget choice) is to look at cargo vans - or so I thought.  Thanks to COVID, the market for these (like many other things) has gone bonkers as every unemployed rocket scientist in the world rushes out to grab a used van to deliver for Amazon.

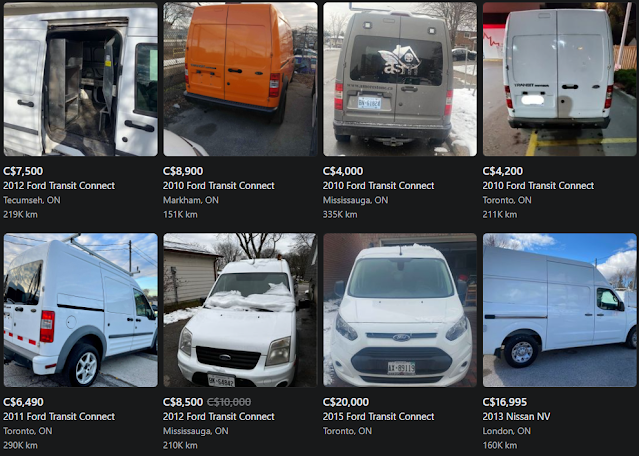
Here are some current online choices:

My favourite is the fuggly Transit Connect that isn't even big enough to hold a single bike and is almost a decade old with over two-hundred thousand kilometres on it for $10,500, $8,500.  Eight and half grand for a heavily used POS.  Both my current on-road bikes, an '03 Triumph Tiger and an '10 Kawasaki Concours together cost me less than that, and they're both a joy to look at and operate, though carrying a dirt bike on them isn't likely.

If I want to get my Guy Martin on, New Transits start at thirty-five grand and can easily option up to over fifty.  The bigger Ram Promasters start at thirty-seven grand and can option to over twice that.  The wee Promaster City starts at thirty-four grand and can be optioned well into the forties.  Vans only really do the cargo thing and make any other usage tedious, and they're expensive!

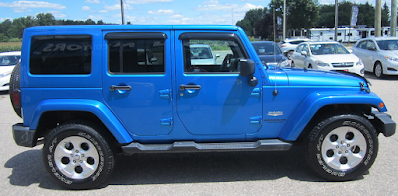
The used car lot down Highway 6 has a 2015 Jeep Wrangler with 90k kms on it that they're asking $35k for it.  It isn't cheap but it seems in good nick and comes with the tow package.  We rented a Wrangler last year and I was impressed with its ability to carry weight and it's utility - it was also surprisingly fun to drive... and in the summer it'd get the doors and roof off and be able to do the Zoolander thing too.

A trailer goes for about a grand, this one comes with a ramp and he's asking $1300.  With a bit of bartering I could sort out a tow capable Wrangler with a useful trailer for under forty grand.  The Jeep isn't new, but it's only 6 years old and with a big v6 in it, 90k isn't too much of a stressful life - it actually works out to only fifteen thousand kilometres a year.

What's galling is that you're thirty-five grand into a years old almost 100k kms vehicle but the new ones run fifty-three grand - I guess you've got to have a lot of cash on hand to buy anything these days.

What'd be really nice is a state-ot-the-art Wrangler 4xe.  They tow, use very little gasoline and when things get sorted out with in-car fusion generators, I'd be able to take the gas engine out and go fully electric with it.  In the meantime, it'd carry all my bike clobber, would be a bulletproof winter vehicle and when the sun arrives I can pop the doors and roof off and enjoy it in an entirely different way; they really are Swiss Army knives!


SPORTS RIDING OPTIONS: Trials


Once I've got the moto-logistics worked out I could then focus on some sporting motorbiking.  This ain't cheap either, but some sport motorcycling is cheaper than others.  Trials riding is probably at the cheaper end of things with used bikes starting at about two grand and new, high-end performance models going up to about nine grand, though you can get a new, modern, Chinese made machine for under five grand.

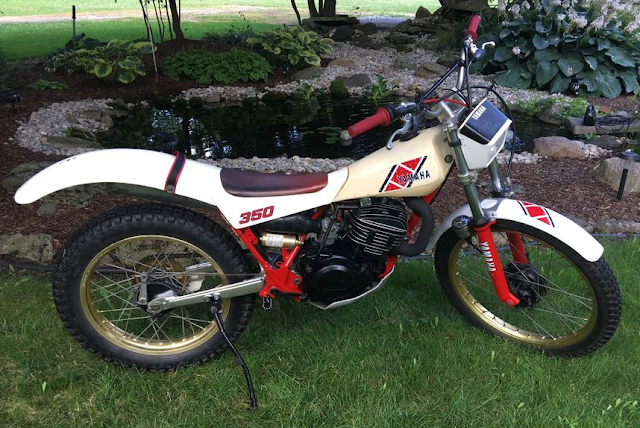
I'm partial to older machines as I don't have to deal with dealer servicing and can do the work myself.  This mid-80s Yamaha TY350 comes with lots of spares and is in ready-to-go shape for about $2600.  Since I'm not looking to take on Dougie Lampkin, this'd more than get me started in trials.


The Amateur Trials Riding Association of Ontario offers regular weekend events throughout the summer and fall and would make for a great target to aim for.  I'd be a rookie, but I'm not in it to win it, I'm in it to improve my moto-craft and trials offer a unique focus on balance and control in that regard.

I'm disinclined to exercise for the sake of it, though I've never had trouble exercising in order to compete in sports, it's just hard to find any when you're a fifty-two year old guy in Southwestern Ontario.  Having trials events to prepare for would be just the thing to get me into motion.

There is also the Southwestern Ontario Classic Trials group, who also offer a number of events and categories and seem very newbie friendly.  That old Yamaha would fit right in with classic trials and would let me do my own spannering.

Our backyard has everything you'd need to practice trials, though tire tracks all over the lawn might not endear me to my better half.  Even with all that in mind, trials riding would be the cheapest moto-sport to get going in.


SPORT RIDING OPTIONS:  enduro/off-road riding


What's nice about the dirt-bike thing is that I could do it with my son, Max.  He got handy with dirt biking last summer at SMART Adventures so if we got into trail riding we could do it together.

Used dirt-bikes start at about $2500 and creep up quickly.  Most seem quite abused but appear to hold their value regardless.  For about six grand I could get us into two 21st Century machines that should be pretty dependable on the trails, the problem is there aren't any around here.  We'd have to drive for hours to get to the few that are left in Central Ontario.

The Ontario Federation of Trail Riders would be a good place to start in terms of working out trails and connecting with others interested in the sport.  Off Road Ontario offers access to enduro and motocross racing, but I'm not really into the yee-haw MX thing, though long distance enduro gets my attention (every January I'm glued to the Dakar Rally).  I also watch a lot of British television and I've seen a number of endurance off-road events on there that are appealing, so I wouldn't wave off enduro without looking into it a bit more.

SPORT RIDING OPTIONS:  track racing


There are motorcycle track days around Ontario from May to October.  The Vintage Road Racing Association seems like the best way in for someone not interested in becoming the next Marc Marquez but who is looking for some time on a bike working at the extreme ends of two-wheeled dynamics without having to worry about traffic.  The VRRA also offers a racing school to get people up to speed (so to speak).  I can't say that having a racing licence wouldn't be a cool thing to have.

The challenge with racing on pavement is that everything gets more expensive, from membership and training fees to the cost of equipment and bikes, and of course what it costs to fix them when you chuck them down the road.  Road racing offers a degree of speed and has obvious connections to road riding that are appealing, it's only the costs that make it seem like a step too far.

Sport motorcycling is tricky to get into.  You need the equipment to transport yourself and your bike and gear to where you're competing and then you also need the specialist motorbike itself, but there are options that can make it possible on not to extreme of a budget.  I'm hoping to find a way into this over the next few years.

Sunday, 28 November 2021

1971 Triumph Bonneville Restoration: Front Fork Rebuild

It's all snow and wind outside so I spent a good six hours in the garage this weekend rebuilding the front forks and the triple tree on the '71 Bonneville winter project.


The forks on the bike had been 'choppered' with massive fork tubes and spacers in them.  The bike came with new stock fork tubes so after a cleanup both front forks got rebuilt with stock fork tubes.  I'll put the chopper ones up for sale and see if it'll make a dent in the new parts order I got in.

The internals on the forks were in good shape (it has always been stored inside).  After a cleanup they went back together again nicely.  The picture on the right gives you an idea of just how long those fork tubes were (almost as long as the whole shock!).

The right side front fork went right back in no problem, but  the left side one won't fit in the lower triple tree mount (it has a bolt that squeezes it on but the circular clamp is too tight.  I've tried heating it up and wedging a screwdriver in the gap to respread it enough to accept a fork.  I shouldn't complain, this is the only thing that's being difficult on this fifty year old machine so far.

The lower fork unit as it came out of the giant chopper tubes.

The same piece cleaned up.

Parts diagram from the '71 Triumph's parts manual.

Meanwhile, the first parts order came in from British Cycle Parts.  They were great helping me clarify what I needed to get started.  The order was about $450 including shipping and got here quickly (within a week), one box from their Canadian warehouse and the other from their U.S. one.  I haven't started installing anything yet, but I now have what I need to rebuild the Amal carbs, sort out the electrical system and take apart the motor to prep it to run for the first time.

Motor gasket set!

Electronic ignition system and coils!

Amal carburetor rebuild kits!

Rubber bits!  This time 'round I got a new kickstart rubber & the gear shift rubber.

That's a stock style new rubber to replace whatever the f*** was on it.

The monkey who was choppering the bike put massive footpegs on the rear peg position,
but that doesn't make any sense on a chopper (they're usually feet up and forward).
These are the stock footrests.

Stock foot rests (and hardware)!

The plan is to rebuild the carbs, get the motor sorted, install the upgraded ignition system (which I suspect will also involve creating a new electrical loom) and then see if I can get it all to run.  Once I've got it a step closer to running I'll be back in touch with BritCycle to get the other bits and pieces I need to get it rideable.  The plan is still to get it to a place of getting a safety and putting it on the road next season.

I'm not a big fan of lost causes and I wrench to ride, so the point is to get the Bonneville back into service. After watching a lot of Henry Cole on TV, I like the idea of a 'rat bike', which also means I can focus on the mechanics rather than how it looks.  If I can get the mechanics sorted to the point where I can ride it, I'll do a season with it rough but rideable and then consider my options.  I got the bike and spares for $1500 and I've just put another $450 into it.  I think I can get it roadworthy for under $4000 and a non-running barn find bike of similar era was going for a grand more than that a few weeks ago online, so no matter what the Bonnie project won't ever drip red.

In a perfect world I'll get it sorted and some one will offer me more than I've put into it (cost, not time, I'm happy to put time in keeping bikes on the road).  Whether that's once it's roadworthy or once it's been cleaned up too, I'm easy.  Meanwhile the Bonneville is doing what I wanted it to:  giving me an opportunity to go deep on a motorcycle restoration and learn a lot in the process.

The motor's getting cleaned up and recommissioned.

Once the (now stock) forks are back in I'll wheel it out for a deep clean on the motor
and then start with the electrics before rebuilding the carbs.  With any luck the old Bonnie
will be to the point of starting by the new year.

Somewhere in between all this deep surgery, the Concours needs new brake pads and the Tiger has some new sprockets and a chain to install.  To be honest, these minor maintenance jobs are something to look forward to after the deep diving into the restoration project.

Last winter was a deep maintenance round on the Tiger, but even that pales in comparison to the scale and scope of the Bonneville restoration.  Practical Sportsbikes and Classic Bike are both magazines focused on hands-on motorcycle mechanics and both have talked about the dreaded project stallout that can happen when it all gets too much.  I'm taking the advice of both mags and breaking this up into chunks and then solving things subsystem by subsystem.  The small wins help me feel like like the project is progressing and prevent the dreaded project-stallout from being overwhelmed by the whole thing.

On the upside, the fact that we got 15cm of snow over the weekend isn't really on my mind as I'm keeping track of many things-to-do in the garage.

Sunday, 3 October 2021

Taking My Motorcycle Restorations to the Next Level with the help of the Canadian Vintage Motorcycle Group

Heavy rain all week made Beaver Valley a
muddy mess.  The Tiger waded through it all,
spinning it's wheels in the deep mud but
always getting me down the track.
Sunday was a long ride up north to clear my head after another week of pandemic teaching where they pile on extra work going on two years into a pandemic and then reduce your ability to do it.  The trusty Tiger was on song and we sailed and sailed, up past Horning's Mills and through Creemore before tackling the Grey Highlands.  I was timing the ride because I had a meeting!

Last week I joined the Canadian Vintage Motorcycle Group and then connected with their Facebook page (that part is free - if you're into old bikes I'd urge you to join up!).  By dumb luck the admin who accepted my FB group request happens to live nearby and has a lockup ten minutes from where I live.  He asked if I wanted to see what he had kicking around in terms of project bikes I could buy.  That CVMG membership is already paying off!

Four hours and three hundred kilometres later I rolled up to a farm just south of town and met Brian and his lovely wife Terry.  We drove down to his storage containers out of sight at the back of the farm and he unlocked a hidden magical kingdom!

The bike I think I'm going to do a full ground up restoration on is a 1971 Triumph Bonneville.  This year was the first oil-in-frame model.  There are benefits to this model that suit me, the main one being that this bike has a taller seat than other Bonnies.

The bike in question has been partially 'choppered' with a big sissy bar and king/queen seat.  It also has long front forks - someone was on their way to turning this into some kind of Easy Rider homage, but it won't stay that way.  I'm not stuck on the stock-at-all-costs angle but I like motorcycling for the dynamic feel of it and a chopper isn't about that.  A modernized custom that stays true to the original look but makes use of the bits and pieces that will make this classic a bit more dependable is where I'm at.


Fortunately, Brian has lots of stock spares which he'd include with it so I'll be able to strip it down and begin working out how to put it all back together again without having to start from scratch.  When I pick up the bike I should also be getting some tupperware boxes full of additional parts.

Classic Bike Magazine had a great issue in June about Steve McQueen, On Any Sunday and desert racers.  McQueen himself did a Bonneville desert sled back in the '60s.  I like the stripped down scrambler look of that kind of bike, though I'm not going to go all knobbly tires and brown seat with it, but a simplified, high piped Bonneville for the road?  That's something I could get into!

I'm going to have to wait until after Thanksgiving Weekend to get my hands on it. I 'll also have to figure out how to get it over here, but I'm looking forward to my first deep bike resto after successfully putting a number of early retirements back on the road again.  This one's going to be an engine out, frame up restoration, Henry Cole style!

Brain had some beautiful old bikes - this 1950s BSA bitsa was a wonderful looking mashup.  The only thing that made me hesitate was the 350cc engine trying to move my bear-sized self around.


Back to stock? The '71 was the first of the oil in frame Bonnevilles and an odd duck with
a tall seat height, but it was also a handsome thing!

Here are some other resources and reference images as I bring this old thing back from the edge.


"The new frame raised the seat height to 32” which meant only tall riders could really get both feet down" - yeah, that's not a problem for 6'3" me.