Saturday 26 February 2022

Zipper Replacement on a Motorcycle Jacket

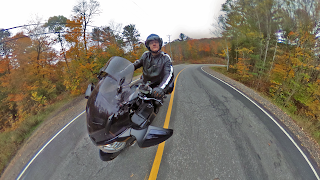
Back in 2016 we did a winter family holiday to Las Vegas and then drove down to Phoenix.  While there my son and I rented a bike and rode the Superstition Mountains just east of the city.  Having done some research, I thought I'd try buying a leather bike jacket while down there as US prices tend to be much kinder than Canadian ones.  I ended up with a Bilt black leather bike jacket that I've used on cooler rides since.  It's not high tech protection wise but the leather is thick and the jacket is a solid thing.  It was the last of the 2014 designs and I got it on sale ($159!) as they were wrapping up their Christmas shopping season at the CycleGear shop in Mesa.  Your typical excellent American sales service too.

Since then I've done thousands of miles with the thing and it has always done the job.  It isn't well vented so it tends to do early spring/late fall duties.  This past fall on my last big ride of the year I was wearing it for the 270km ride up to Deerhurst Resort and then it handled a torrential downpour when I rode into Algonquin Park the next day.

It was all good until on the way home I undid the zipper and it came off in my hand when I stopped for a drink before heading back south.  I managed to get the zipper to reconnect so I wasn't flapping all the way back, but a broken zipper meant the jacket couldn't be used anymore, which made me sad.  What followed was a deep dive into zipper technology as I attempted to fix it.

A six year old leather jacket might not be my first choice when getting caught in a downpour, but it did the job!  The hotel room had a lot of drying leather hanging up in it when I got back.


Some online research had me filling my head with new zipper related vocabulary.  The retaining box on the jacket had come off when I pulled the zipper down.  Most of the online advice (which turned out to be right) suggested that you can't fix a broken box, it requires a zipper replacement, but on a thick leather jacket that seemed like a bit much.  Of course, Amazon sells crap that insinuates that you can fix a broken retaining box, so I wasted money buying that and then found that it wouldn't grip and simply didn't work, even after multiple attempts.

Top Tip:  don't waste your time trying to fix an old zipper.  It took some effort, but removing the old zipper and installing another is just some work and isn't impossible.

I finally ended up buying a quality YKK replacement zipper (after learning an awful lot about YKK zippers).  My crafty wife has all the sewing kit so she gave me a seam ripper that made removing the old thread very easy.  If you've got an exacto knife or craft blades and steady hands you could probably remove the thread that way, but the seam ripper does it without damaging the material.  With the old zipper removed and the outer leather separated from the inner liner, the jacket ended up sitting under my work table for a couple of weeks because the thought of pushing a needle through the leather seemed like a bit much, but it's no harder than other mechanical work (makes your hands ache though).

I got some heavy duty coat thread when I purchased the replacement zipper.  This stuff is nylon-rope strong which helped with the sewing, which I did by hand.  The stitching doesn't look like it's done by a machine but it's consistently spaced and didn't cause any pinch points up the zipper.

I came in through the back lining and out through the existing holes in the leather.  By separating the layers I was able to line up the needle with the holes and then it was just a matter of keeping everything straight as I worked my way up the zipper hole by hole.  Alanna suggested I start at the bottom and work up - that was good advice.

Using the existing holes on the thick hide is the trick.  You might be able to do this on a machine but I don't know how you'd do that as the jacket material is thick and you'd need to align the holes the machine is punching with what is currently there.  Doing it by hand is a bit tedious but it works and means you're not punching any new holes in anything.

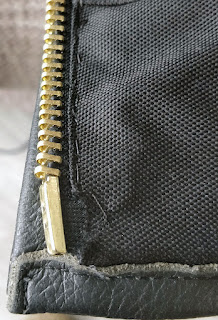
When I got to the top I tucked the zipper (I couldn't get one the exact length of the old one so got one about half an inch too long) into the collar which had been separated when I removed the zipper thread.  With the top of the zipper tucked into the collar, I sewed everything up using the existing holes in the leather.  Once again, separating the material let me align the needle with each hole one by one.

The final product zips up like new and has no pinching or clumping on the front of the jacket.  Sewing in the other side was easy.  I separated the zipper once one side was in and then  did the other just the same way.  By the time I was wrapping it up I'd gotten quick at it.

Alanna had a thick needle and that strong thread really helped the process.  With a leather jacket the trick is to use the existing holes in the material rather than trying to punch new ones, which in my case meant doing it by hand.  The end result is that my old leather jacket, which now has some nice patina on it, is back in service and ready for the 2022 riding season, should this never ending winter end.


If you lose a zipper on your favourite old motorbike jacket, don't toss it out.  A replacement zipper is less than $15 (CAD) and with thread and other odds and ends you should be able to replace that tired zipper with something that'll let you enjoy your well loved leather jacket for years to come.

Saturday 19 February 2022

650cc Air Cooled Triumph Bonneville Exhaust and Seat Options

More 1971 Triumph Bonneville restoration project research (all prices courtesy of BritCycle):

High pipes:

721-T74X exhaust pipes - $304.51/pair.
711-709669/9670 mufflers - $486.00/pair.
2x 742-158 clamps - $16.61 ea.
70-9673 “H” connector - $72.28.
2x 742-112 clamps - $16.61 ea.
TOTAL:  $930

Plus associated bracketry and hardware, etc if needed. The one item we’ll have difficulty sourcing will be the ‘chip basket’ heatshield; our manufacturer of those long since retired.


Looking like Steve McQueen on a scrambler styled Bonneville costs extra!  Britcycle said they might have some scratched and dented options on sale, but those aren't regular stock (obviously).


Stock(ish) exhaust system:

721-T79 exhaust pipes - $289.02/pair.
712-102 Dunstall decibel replica mufflers - $330.32/pair.
70-9888 balance tube - $29.09.
2x 742-138 clamps - $16.61 ea.
TOTAL:  $683


What I'd really like to do is form my own pipes, but I don't have the space, equipment or time to do that.  For this project I think I'll use it as a learning process and get this particular Bonneville cleaned up and mechanically sorted and leave the radical customizations to a future time when I'm loaded, have lots of free time and a much bigger workshop with a full range of tooling in it.

I think stock is the way I'll go on exhausts...

As far as seats go, BritCycle has just the sort of thing I'm looking for: 


The only thing that might knock it out of contention is if, price and fit-wise, Corbin's customizable seat is in the ballpark.  It says they might fit a '71 but they're mainly for '72 Triumph twins and up.


Quality (made in England) newly manufactured seats specific to the oil in frame 650 twins run at about $500US ($612CAD) - I'm not sure what Britcycle's go for.  The customizable (and probably higher quality) Corbin is $618US ($788CAD).  There are cheaper options manufactured in India & China to less exacting standards to consider too.  I'll be keeping that all in mind as I juggle seat options and make a decision.

Friday 18 February 2022

Old Bikes Tell A Story

I took the big SLR into the shop for some closeups.  These are photos from the 1971 Triumph Bonneville T120 project currently in process.

Call it patina, or scars, but the years on an old bike tell a story...

The 'spare' cylinder sleeves after some clean up.


Orange was the colour of panic in the early 80s.  The cylinder head was covered in this stuff in an attempt to seal a leaky motor during the aborted chopper phase of this bike's life.

That's the motor stamping (from Jan-Feb 1971).

Lucas! The Prince of Darkness™


My kind of still life.


Patina that tells a tale.


Thursday 17 February 2022

1971 OiF Triumph Bonneville Restoration: a seized top end

The old Triumph motor has refused to turn ever since I picked it up in the fall.  Every attempt at cycling the engine has failed so last weekend I dug into the top end, which turned out to be much more difficult than it needed to be.

Many moons ago I was putting myself through university by working as the service manager at an automotive shop.  One of our technicians, Jeff, always cheerfully described a situation where you're up against parts that don't want to move as a 'bend the fuck out of it' situation.  I'm no fan of pointless violence when it comes to mechanics, but there does come a point where you've either got to 'give 'er' (another of his favourite sayings) or give up.

Your mood when performing mechanical taks seeps into the machine.  If you're angry when you do repairs, that anger ends up in the mechanical work you're doing, which usually doesn't end well.  A Zen approach to mechanics usually creates a zen machine that doesn't emit the drama that an angry machine will.  Having said all of that, I'd pretty much emptied my swearing vocab by the time I had untangled this Triumph twin on Sunday.

Having never worked on this kind of motor before, I was lucky enough to get a spare head and cylinder sleeve when I got the bike, so rather than go in blind I disassembled the spare unit first to see how it all went together.

I continue to enjoy working on this pre-digital, very mechanical motorbike.  While it isn't as efficient and exact as a modern bike, there is something very satisfying about getting the mechanical bits lined up so that they work together.  When it's finally running it'll feel like I've rebuilt a Swiss watch.

With the practice head disassembled, I began removing the head on the bike.  It came apart as my reconnaissance suggested it would and looked mechanically sound with no discolouration or obvious wear.  The bad news came as I finally got down to the head gasket.


The right hand cylinder looked fantastic, but the left side was a mess with a thick layer of corrosion and an obviously seized-in-the-sleeve cylinder.  I'd expect to see something like this on a water cooled engine when the head gasket has failed allowing water and coolant into the cylinder, but this is an air cooled unit with no coolant in sight.  My best guess is someone left the spark plug out in a damp environment for an extended period of time letting moisture in to disastrous effect.  It's amazing what a bit of laziness or stupidity can be amplified into over time.

With a cylinder seized in the sleeve, I was left in a bind (see what I did there?).  I left it soaking in brake fluid overnight (I'd tried WD40 previously), but the next day it was just as stuck.  I applied heat, and then tried to lever the head off the cylinder to no effect, which led to that Jeff moment where I had to decide how far I'm willing to go to win (the answer is: all the way, in case you were wondering).


What followed was longer and longer breaker bars to apply more leverage, mixed with some applied heat from the propane torch.  What finally ended up working after a couple of hours of swearing and sweat was applying heat, inserting a long piece of wood to lever the head up while applying some focused violence to the cylinder top.  Millimetre by millimetre the cylinder sleeve eased up until the head finally came free, which was good because I was all out of swear words by that point.


I was rewarded with a couple of nice observations once the damned thing came off.  Firstly, the bottom end moved very smoothly for a motor that hasn't spun in 30 years.  There is no play or noise in the big end as it turns.  Secondly, the kickstarter I rebuilt the other week works perfectly, engaging and spinning the motor when applied and not interfering when left, which was satisfying.

Looking at the jammed cylinder, it looks heat seized with burn marks all over the inside and physical damage up the side.  If replacements aren't crazy, I might use the spare head I've got to get things into motion, but if it's going to cost a lot to the replace these bits I think I'm looking at a more aggressive customization option:  a 750cc big-bore kit.

Dropping $1000 into a broken motor seems extreme (it is extreme), but I've had to recalibrate my what-I'm-willing-to-pay index throughout this project; vintage ain't cheap.  If it's going to cost the better part of $500 to get the motor back to stock, why not get all new parts and get an engine upgrade in the process?

Before: sleeves like that usually slide off.  Cylinders are snug but not stuck.

After: a couple of sweaty, intense hours later.  It was a satisfying win.

I've done a number of projects now where I get a sidelined bike back on the road, the most recent of which was a '97 Honda Fireblade, but I've never had to do a complete engine rebuild.  Unlike some of my more fraught earlier mechanical work on the only bike I owned that was keeping me from the far-too-short Canadian riding season, I can take my time with the Bonnie and go all the way if it needs it and I'm up for it.  The only thing producing drag is my inherent cheapness.

I'm still intent on making sure the project pays for itself.  It doesn't have to pay me for my time, this is a hobby, but when I sell a restored machine and it balances the books in terms of purchase price and parts, I find that inherently satisfying; it means my hobby is a zero-sum game.  The Bonnie currently owes me $1500 for the bike and spares and another $500 in parts so far.  Rebuilt in running shape (but customized and I'd say pretty fugly) similar Bonnies are asking $7500.  If I can mechanically restore this bike to good running order and clean it up, a $5000 budget should see me well into the black.

Now to decide how to drop the next three grand on this thing...


Some other photos from the work this past weekend:

Seized cylinder soaking in brake fluid overnight.

First look at the head gasket after getting the cylinder sleeve off.

A disappointing first look into the heart of the Triumph.

This is the head on the bike motor.  The other head must be from an earlier machine, or it's missing parts.  Those risers with bolt holes in the top were on the '71 top end but not on the other one, which looks to be an earlier unit (Triumph built the 650 twin for many years).


I get a great deal of satisfaction from cleaning up the old parts on the wheel in the shop.  This is an exhaust clamp, lovely patina!

This is the 'practice' top end on the bench.  Unlike other top ends I've been in (my 'modern' Triumph Tiger, the Fireblade, etc), this isn't an overhead cam motor.  It uses push rods to operate the valves from down below (they're dead centre in the photo).

Tuesday 1 February 2022

Triumph Tiger 955i Fuel Injector Cleaning

We're seeing temperatures in the low -20s these days and waves of snow passing through creating banks that are hard to see over.  To quote the Penguins of Madagascar...

The roads themselves are sanded and snow covered too.  We've got a major storm rolling in tonight that looks like it'll pitch another 48 hours of the white stuff at us.

At this time of year I tend to be in a mood as it's been far too long since I've leaned into any corners.  Compounding the lack of riding is the tricky nature of trying to find parts for the old Triumph Bonneville in order to keep that project purring along.  What parts there are pretty damned expensive too.  I'll get back into it soon enough, but in the meantime I thought I'd give the new (er) Triumph's fuel injectors a cleaning.

I've been in and out of the Tiger so many times that it's second nature.  The tank removal process (which is pretty complicated involving removing 4 panels and many awkward fasteners) can be done (blindfolded!) in about 10 minutes.

Last year I installed a new regulator/rectifier, but didn't install it properly because I didn't want to dismantle the whole lot.  The first job was to properly fasten it down.

The second job was to remove the fuel rail.  This is easy on the 955i Tiger (two bolts), but one was threaded (having a 19 year old bike as my regular runner does produce some headaches).  A cunningly installed second nut on the back of the threaded one had it all back together tight though.

For the fuel injectors I heated up the ultrasonic cleaner to 65°C and ran the vibrations for 20
minutes before cleaning them up with fuel cleaner.  The injector nozzles are very fine, so even a small piece of gunk getting past the fuel filter could cause headaches.


Once cleaned and sorted I press fitted the injectors back into the rail and reinstalled it back onto the bike.  The injectors press fit (there are thick rubber gaskets on each end) into the metal injector body on the bike too.  The only tricky bit was sorting out that threaded mounting bolt, but there is space behind the rail for a second nut and it did the trick.  While I was in there I cleaned all the electrical connections and put dielectric grease on the connectors to keep everything neat and dry.

It all went back together well and I had the tank back on and the Tiger back in hibernation before it knew what had happened to it.  I'm hoping the cleaning sorts a slow starting issue that developed after I solved the stalling issue last summer.

The old Tiger's fuel injection is one of the crankiest things about it.  Early mechanical fuel injection is famously, um, personality ridden.  The latest (delightful?) bit of character is having to lean on the starter motor for several seconds before it fires.  It used to fire at the touch of the starter, so I'm hoping to get that back again.

We're in the middle of semester turnover and I haven't had time to chase the old Triumph parts guys (who like to do things old school on a telephone), but that's next on the list of things to do before the weather breaks and I can lean into a corner again.

Monday 17 January 2022

How Bespoke is Too Bespoke?

Owning a Fireblade checked a box, taught me
many things and was a zero cost experience!
I always try to balance out bike projects so that I land in the black on them.  I've gotten pretty good at this.  The Fireblade Project cost me about $2300 all in and then I got to ride it for a season before selling it for $2500, which I then put towards the Concours14.  Even with fancy seats, windshields and other gubbins, the Connie only owes me about $7000.  Older model, double the mileage bikes are going for eight grand, so I'm still ahead there too.

People who throw big money down on customization that they like seem to think other people will pay extra to adopt their choices and tastes, which never made a lot of sense to me.  This goes for houses or in vehicles - just because you're willing to pay a premium to get a certain look, doesn't mean anyone else is, and expecting them to shell out for your choices is a bit naive.


The Concours was a cagey purchase that
still has me well in the black.
What does always sell is functionality.  As much as I'd like to get all romantic and throw money at the old Triumph I'm restoring, I'm more interested in making it work, and then riding it.  To that end, I'm not interested in creating a perfect replica of a 1971 Triumph Bonneville to put in shows, so modern touches (especially when they're more cost effective than stock-at-all-cost options) are something I have no trouble with.  A bike that starts easily and runs sweetly sells itself much more quickly than a cantankerous but period correct trailer queen.  One's a motorcycle, the other is art, and art is notoriously in the eye of the beholder.

One of the reasons I've always gravitated toward cheap and cheerful 80s and 90s Japanese restos was because the parts are usually easy to find, including hard parts from a breaker if needed, and they're as cheap as chips to buy because people tended to use them rather than put them up on a pedestal.

My first brush with 'vintage' (I think a 51 year old air-cooled Triumph from before the collapse of the British bike industry qualifies as vintage) has me wondering if my approach still works.  The cost of parts is much higher than more recent Japanese bikes and this particular Bonneville was half taken apart by a muppet who wanted to be in Easy Rider, so I'm constantly finding parts missing or incorrect.  I'm also struggling with missing non-metric tools after having owned metric bikes my entire life.

When I'm reading Practical Sportbikes I enjoy the articles on DIY and the stories of scratchers who got a machine put together with their own hands.  When they run one of the 'specials' articles where it's a rich guy with clean hands throwing money at a project, I lose interest quickly.  Classic Bike Magazine is similar.  When they're talking about an owner keeping an old machine running on ingenuity and guile, I'm all in, but the minute it's a millionaire adding to his collection with another bespoke machine put together by someone else, I've lost interest.

I just finished Guy Martin's new book, Dead Men Don't Tell Tales, and Guy ends the latest one talking about trying to find what makes him happy.  This requires a fair bit of self awareness - something that most people don't have.  Guy's particularly difficult in that he will often act on an urge that turns out to be incorrect, but, as he says in the book, he's evolving.

There's a scene in Guy's Garage where Cammy, his professional race mechanic mate, knows how to fix the car they're working on but Guy has his own ideas and keeps bashing away at it wrong.  Rather than push the point, Cammy backs off and waits for Guy to realize he's using the wrong tool for the job.

Guy is critical of Cammy for being slack in his approach to work in the book, but I'm left wondering if the truth isn't somewhere in between:  what looks like a lack of effort from Guy's point of view is actually a better use of his energy from the professional race mechanic's point of view.  There's more to all this than just jumping in to the physical labour, you need to be exercising the grey matter too.

What I'm taking from this latest round of Guy Martin media is that you're more likely to stay engaged with and finish big projects if they make sense to you.  To that end, I spent yesterday working out why the kickstarter on the Bonneville wasn't working (the muppet had put it in backwards).

The goal is still to have gone through the whole bike and have it back in working order without breaking the bank.  The amount spent on it matters less than whether or not the project is in the black.  If a functional '71 Bonneville is worth about five grand, then that's what I'll work to on the budget, while keeping an eye on what engages me most about all this:  putting a sidelined bike back into service again... and then riding it!

This morning I'm looking at Motogadget's mo.Unit Blue and considering how to best tackle a 51 year old wiring loom that looks to be in good shape but should probably get rebuilt if dependability is the goal.  An ignition powered by bluetooth on a smartphone is just the kind of steampunk anachronism that a riding focused buyer would dig.  That it's also invisible means it won't hurt the look of the bike (the only change is the ignition key isn't there).

Got into rebuilding the Amal carbs only to discover the muppet who took them apart before didn't install any of the air slider hardware for the choke, so now I'm hunting for hard parts for 51 year old carbs... in a pandemic.  Note my anemic imperial socket wrench set.

Ready to go and then stopped - neither carb has the air slider or hardware in it.  I'd normally call around to the local breakers, find a donor set of carbs and then keep them handy for situations like this.  That isn't an option with a 51 year old British bike.

It's coming along - slower than I'd like, but it's coming along.  When it seems too much I remind myself why I'm doing it: one day soon that engine will turn over for the first time in decades and shortly after that I'll be out riding the thing!