Showing posts sorted by date for query concours. Sort by relevance Show all posts

Wednesday 13 March 2024

Going Aftermarket with Kawasaki GTR1400/C14 Tire Pressure Sensors

I soldered a new battery into the rear temperature sensor on the Concours when I changed the back tire last year after picking up a puncture. The front was starting to get sluggish when connecting wirelessly, suggesting the battery was dying and the front tire was due a change, so I did that one in the fall. Unfortunately the sensor didn't pick up signal after reinstallation. Rather than beat up that old sensor again I started looking for alternative options.

I love a good hack, and Big Red walks you through one here on how to take aftermarket tire pressure sensors, program them to your stock Kawasaki and then use them instead of expensive stock items. The coding unit is $230, but works on anything, meaning I'm not beholden to a dealer for tire pressure sensors on the cars in the future either. A pack of 2 sensors is $95, so all together a full sensor replacement on the bike including the tool needed to program them was $325. The stock sensors are $258 each, so an eye watering $516 for the pair. $200 cheaper and I have the tool that's usable across a wide range of vehicles. That's my kind of hack!

How did it go? After all the frustrations with the Tiger and Triumph, the C14 reminded me how nice it is to work on a bike that's supported by its manufacturer, riders and the aftermarket.. When I compare the thriving online communities at COG and other online forums that support Kawasaki ownership, I can only think, 'way to go team green.' By comparison I read a post on one of the Triumph forums that said, 'these forums are dead. Everyone is giving up on these old bikes..." Except the bikes in question are not that old.

When I walked into my local Kawasaki dealer and ordered parts for my mid-nineties C10 there a few years ago there was never an issue. If I hop into an online forum for the Kwak I see an active community full of ideas and support.  Most of the Hinckley Triumph forums for anything over 15 years old are derelict. The posts on them are at least five years old giving you some idea of what trying to keep an older Hinckley Triumph on the road is like (ie: impossible - the manufacture considers them disposable bikes). It makes me question owning another one, which is a real shame because I wanted to believe in the brand, but they only market their history, they don't honour it by supporting owners in keeping old Hinckley machines in motion.


Back in the land of the living, Big Red's walkthrough was spot on. I popped one side of the new front tire off the rim and removed the 14 year old sensor. I couldn't see why it wasn't getting power - my soldering looked good - maybe a bad battery? No matter, new parts are going in.


If you know Big Red's Mazda 3 2004 sensor hack matches Concours ones, then the rest is straightforward. I set the MaxiTPMS unit to the Mazda settings and then put in the ID number from the old C14 sensor. The wireless upload only took a few seconds.


I could also check the sensor once it was programmed, which gave me some piece of mind before putting it all back in the tire. Though an alternative is to set the sensor when it's installed, which is also an option (the programming unit could still see and modify the sensor in situ). This also means I can test and even reset sensors without having to pull the tire in the future!

The whole process was straightforward, aided by a warm March day where I could leave the tire in the sun while I set the sensor. Warm tires are much easier to stretch over the rim!


I installed the new sensor which fits snugly in the rim. All the parts including the tool from Autel felt like quality pieces that will last. With the tire reinflated I put the wheel back in and torqued everything to spec while also making sure everything was grease free (especially the brake bits).

I took it up the street with the intention of riding around the block because that's how long it usually takes to get the dash reading the wheel pressures, but this new sensor had it showing in seconds - before I even got a hundred yards up the road. I checked it against the digital tire pressure gauge and it's right on the money in terms of accuracy.

It felt good to have a win in the garage after banging my head against the Tiger for so long. Speaking of which, I recently attempted to plastic weld the part they won't supply any more and as I was putting it back together the wiring broke off on the fuel level unit (because I've had the tank off so many f***ing times!).

I'm so bloody minded I'm going to try and solder the wire back on even though it broke in the worst possible spot (right at the unit so there isn't much to work with). The stock unit probably isn't available and is a salty $155 even if it is.  I'm doing this in part just to see if the latest attempt at keeping the old thing in motion works. The plastic welding on the idle speed control valve (which they don't even list in parts now) went well and the piece seems serviceable. I want to see if it works.

If I had more time I'd see if I could find an industrial CAD shop who could 3d scan it and then get me a file that I could use to 3d print a replacement. What would be even nicer would be if Triumph shared that CAD file with us all since they aren't bothered to produce the part anymore. With a bit of collaboration, the aftermarket could help keep older Hinckley Triumphs in motion.

As much as it pains me, I think I'm going to take Triumph's hint and let the Tiger go... which is something I never thought I'd say. So much for my goal of hitting 100k with it.
It is actually nuclear powered - the plutonium goes in under than panel, like on Doc Brown's DeLorean...

Tuesday 17 October 2023

Finding Your Way Around OEM's Giving Up on Parts Support: Triumph 955i Fuel Injection Seals

With Triumph giving up on my Tiger before I'm prepared to, I'm going to document the research and give details on what works when you're trying to keep a Triumph 955i's fuel system working by replacing old o-rings.

This has involved a crash course in o-rings and engine operating temperatures. As I work out a fix here I'll post details on o-ring sizing, what type works and include data on measuring the intake manifold at temperature.

It's been all Concours for the past few weeks while the Tiger is laid up. I'm hoping to get the fuel system sorted before the snows fly and I have to wait for next year.


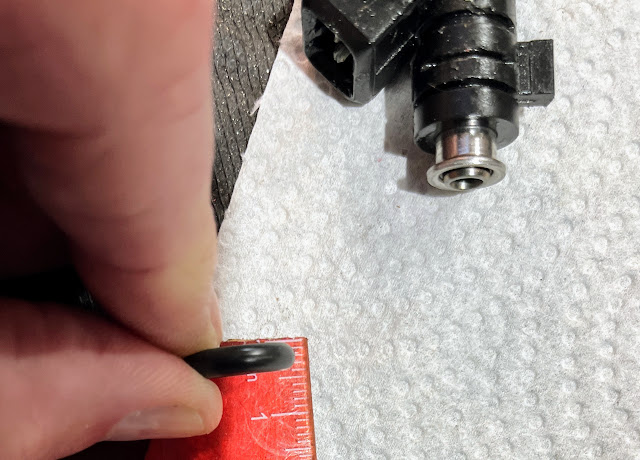
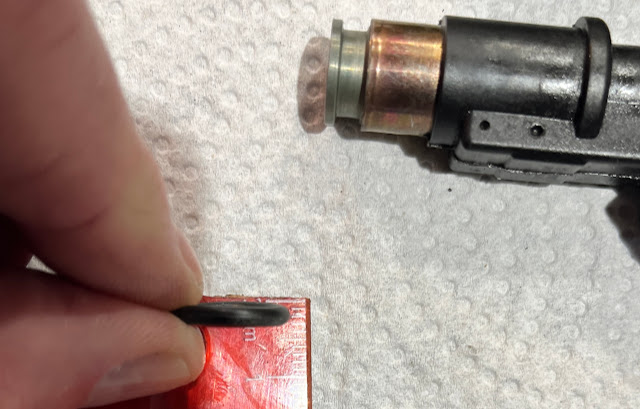
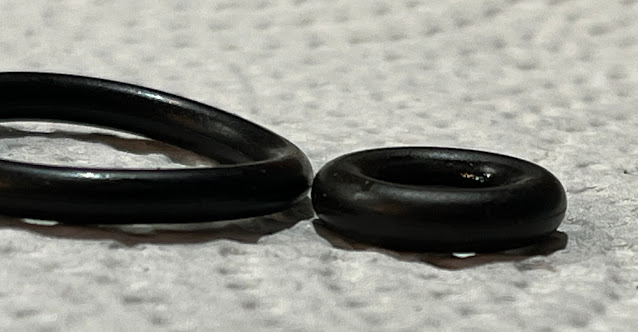
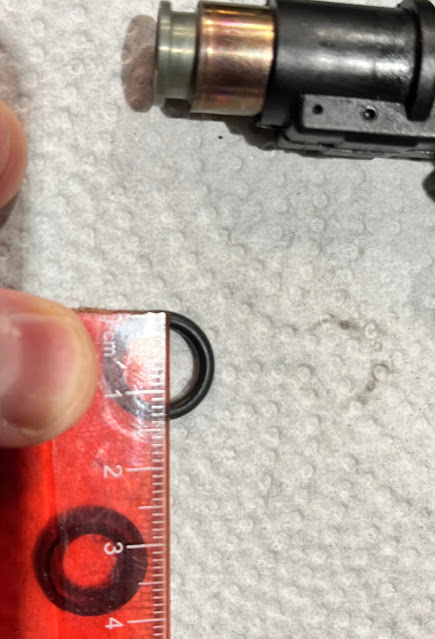
Here are the measurements for the upper and lower fuel injector seals. The classy move by Triumph would be to open source publish the technical details for all the parts they no longer support so that the rest of us can get on with keeping the history of the marquee alive. With that in mind, here are the deets for the upper and lower fuel injector o-rings:

The thick ones go on top where the fuel injector meets the rail. My best guess is 3mm thick by 1.5cm outer circumference.


The skinny ones go on the bottom where the fuel injector slides into the intake manifold.

My best guess there is 2mm wide by 1.4mm outer circumference. 


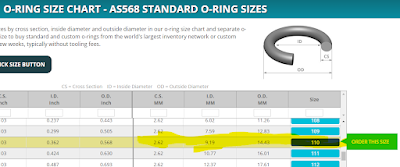
Unfortunately, buying off the shelf boxes of o-rings isn't likely to get you anything that fits. The two below from Amazon didn't. This thing looks handy: https://www.allorings.com/O-Ring-AS568-Standard-Size-Chart.

The Tiger is a metric bike, so I'll work in mm (if Triumph went imperial on o-ring, what the actual f***). The thicker o-ring is 1.5cm or 15mm outside diameter (OD) and (I think) about 3.5mm cross section (CS). Looking at that chart, the #203 is a 14.58mm outer diameter with a 3.53mm cross section. That makes it mighty close. What would be nicer would be if Triumph just came out and gave us the precise sizes for these parts it has discontinued. Triumph?

The thinner one is also a 1.5 (ish) mm outer diameter (15mm-ish), but the cross section is thinner - perhaps two and a bit mm, and they have a 2.62mm cross section standard o-ring size. You'd have to hope Triumph didn't make bespoke o-rings for their fuel injectors, right? For the skinny o-ring I think I'd take a swing at the 2.62mm cross section / 14.43mm (1.443cm) size.

The All O-Rings site also has a good description of the materials you want to get your o-rings in. Nitrile and Viton are what I went with in the pointless Amazon order, but those are the materials you want in a fuel heavy application like this.

That's the configurator (right) - pretty straightforward, but it sounds like they manufacture each order, which probably won't make this a viable solution for someone just trying to keep their old Triumph on the road.

If only there was some kind of network of retailers who supported Triumph motorcycles who could order this parts to help their customers keep their older Triumphs rolling... some kind of 'dealer' network who understand how parts work and how to order this sort of thing in large enough quantities to make a profit while offering customers what they need.

RESOURCES

How hot motorcycle engines runs: https://blog.amsoil.com/extreme-heat-is-hard-on-your-motorcycle/

Buna (Nitrile or NBR) o-rings: https://sealingdevices.com/o-rings/buna-n-o-rings/

Viton vs. Nitrile o-rings: https://www.nes-ips.com/viton-vs-nitrile-o-rings/

All O-Rings https://www.allorings.com/

They have sizing tools! https://www.allorings.com/o-ring-kits-and-accessories/o-ring-sizing-tools

I'd prefer to use All O-Rings for the parts, but they might be a B2B type of thing, and I'm not a B.

Amazon's kits:


Turns out Amazon's shot-in-the-dark kits didn't work either. There's more to this o-ring sizing caper to come. I wish I could just 3d print the nitrile o-rings I was looking for (doesn't look like it's additive manufacturing friendly).

Monday 28 August 2023

Concours Tip Over

 No pride here at TMD. The other weekend I went out for a ride with my lovely wife and we stopped for a snack. The parking lot wasn't even but the bike was full of fuel and had the top box on and it was a very windy day. I had to lean on it to get it to stand up and thought it would be ok - you might see where this is going.

I was once told that bikes fall over, it happens to everyone, but I've never had it happen before. I'll be more cautious next time. My best guess is the road behind the restaurant channeled the wind making for even stronger gusts and it toppled the bike. We were around the corner on the patio when I heard the worst kind of smashing sound and immediately got up to come around to see Big Blue on its side. I remembered the lift with your legs holding the handlebar in and the back of the seat, and got the big thing upright again.

It started right up and I rode it around the corner to another spot on more even ground out of the wind tunnel. Much swearing ensued but it was really my own fault. I checked it twice to make sure it was stable, but that second check should have told me I didn't like how it was sitting and I needed to find a better spot. Lesson learned.

The wing mirrors on GTR1400 / Concours 14s are (big) plastic pieces over an aluminum frame. They're one of my least favourite stylistic choices on the bike. They work well but they are enormous and make what is already a big bike look even bigger, so my first reflex was to find a lower profile alternative. The bike looks much more svelte when it's mirrorless.

The only aftermarket option I could find is pretty much the same thing - industrially big. I might be tempted to customize something, like perhaps an electronic rear view option, but something stopped me. I've worked hard to get the C14 to fit, but it never has. Bar risers, modified foot pegs and a pang Corbin saddle and it still feels like it was made for someone else. Love the engine and it handles well enough with the rear tire mod (slightly larger profile balances the bike forward a bit more) and getting the suspension set for my size helped too, but it still feels like someone else's bike, so I started looking at other options.

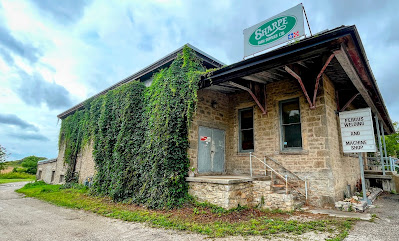
I reached out to the metal shop teacher at my school but he can't weld aluminum. He suggested Fergus Welding & Machine Shop just up the river from us. It was described as 'turn of the century - 18th Century'. I gave them a telephone call (because they have no digital presence at all) and went over to show them my broken mirror frame.

Our shop teacher wasn't kidding. This place is in an old stone building and it was indeed old-school with paper filing upstairs and blacksmith come metal shop downstairs. The broken bit was in fact aluminum and their Yoda-like welder said that if it was 'white metal' he wouldn't be able to do anything with it and that he'd only find that out when he 'hit it' for the first time. I left my phone number on the box and off I went.

I got the bike undressed and cleaned everything up. I'm amazed at how strong the fairings are on this thing. Even with seven hundred odd pounds coming down on it the thing held up with only scratches.


Fergus Welding & Machine Shop called back end of the next day and Dave said he was able to sort it out. It cost me $25 and I tipped them with a six pack. The part was impossible to source used and a new metal piece was asking $260US, so I came out ahead there.

The job was really well done. Dave tacked the part back together following the break and then filled it like the magician he was described as. When I put the assembly back together it fit like a glove - all the holes lined up perfectly and when I took it out for a spin tonight everything is tight and works as it should. It gives you an indication of how over-engineered this bike is that it can tip over, break the metal mirror frame but not smash the mirror itself. There's a lot to like about a C14, but me fitting on it comfortably isn't one of those things.

Undressing the whole bike gave me a chance to clean it up properly. The owner before me parked it in a shed for several years and spiders made it their home. Many webby nests were found throughout, but they're all gone now. It also gave me a chance to lubricate the throttle cables and clean all the electrical connections of which there are many. This bike continues to amaze with how complicated it is, but it's build like a nuclear submarine.


Next steps? Sort out the fairings. If it were a more popular bike I could get some Chinese knock-offs and get them painted for a grand, but I'm not that lucky. I looked up Color Rite who I got the Neptune Blue touch up paint from when I first got the bike. The previous owner had it tip over on him (on the other side) and the touch up made it all but disappear.

Color Rite does good stuff, but it ain't cheap and their shipping (at nearly $100CAN!) is astonishing. If I'm $200 in to touch up, perhaps I can remove the panels, flat them myself and then find a local paint shop to do them up for me. I'll have to see what that costs.

Monday 26 June 2023

Empty Algonquin Park

I managed a couple of days out on the bike around my birthday this year. Thanks to being freed from the shackles of the school year, I was able to do it outside of the May long weekend when the roads would be utterly mad with with ravening hordes driving the largest SUVs they could find and hauling every possible motorized toy to their second homes in the near north.

It ended up being just over 800kms over two days. 500kms on day one from home and up through and around Algonquin Park, then 320kms home on day two.  The Map.

The ride down Highway 9 to the 400 north was packed solid with transport trucks, to the point where I missed the turn north on Highway 27 because I was literally surrounded by the bloody things.

Finally on the 400 north (which was moving well on the Thursday morning before the long weekend), I let the Kawasaki fly and we shot up the road, finally clear of the convoy. I had three things going for me when I crested a hill right into the eyes of a waiting OPP cruiser.

#1: I was making time in the middle lane rather than the fast lane and was following another car

#2: The bike is awfully difficult to get a reading from thanks to not a lot of metal to bounce radar off of

#3: You can always count on some citiot blasting up the fast lane in a mega-sized German SUV

The cruiser lit the lights and pulled out only to collect said SUV out of the fast lane. He wasn't going much faster than I was but he can enjoy that ticket.

The 400 was (incredibly) fully functional and I was around Barrie in no time and moving up Highway 11 at pace. I pulled into Webbers because they have a nice new Starbucks where I got a coffee and stretched. In under two hours I'd covered the 172kms that got me clear of the gravity of the Greater Toronto Area and into the near north.

After a warm up (it was 5°C when I left just past 9am), I was back on the Kawasaki and heading north again. Gravenhurst was (incredibly) efficient and I slipped past what is often a backup without delay. By 11:30 I was grabbing a quick lunch and filling up in Huntsville and then it was Highway 60 into Algonquin Provincial Park.

I stopped at the West Gate to have a chat with the wardens and get my pass as I intended to stop at the Visitor Centre. After a nice chat with the young ladies at the desk I got my pass, set up the 360 camera and then got in motion ASAP because it's blackfly season and boy do they come out of the woodwork when you stop!


Into the park there was very little traffic. The only one I had to make space for was the massive German SUV thundering through one of the most beautiful places in the province at well over 120kms/hr (it's an 80 zone). If you play your cards like that, you're not likely to see anything!


Once clear of the traffic by the gate things got really quiet. An occasional car would pass the other way but there was nothing on the road in front of behind me as I went deeper into nature. It was midday so I wasn't likely to see any big animals (and I didn't), but birds were plentiful with birds of prey over the road and many others in the bush.

It was a glorious ride alone through the park - a place that comes as close to a church for me as anything can be. The bike was the perfect vehicle. I was moving fast enough to stay ahead of the blood sucking insects, but slowly enough to smell the lakes and woods and feel the thermoclines as a dipped into and out of valleys.


The visitor's centre is worth a stop if you're travelling through the park. The lookout off the back is a great view (and high enough up to be relatively bug free!). I would have stayed for a coffee and a snack but the restaurant was closed. It was a good opportunity to clean the bugs off my visor though.


By now it had hit the high of 12°C for the day and though it was sunny it was cool, especially when in motion on the bike. If I stopped I got sweaty and then the flies would come, so best to keep things moving. Out the east gate and then the plan was to ride south around the bottom of the park.

The Concours had been fantastic on the highways and had handled everything I asked of it. The only place I think the Tiger could have done a better job was on Peterson Road, which is your typical poorly maintained Ontario backroad with ruts and potholes that'll knock your teeth out. The sporty suspension on the Kawasaki didn't enjoy that bit of road. The Tiger's longer suspenders would have done the trick, but otherwise the Concours was the right bike for this ride, especially on the highways.

I finally pulled into Wilberforce about 444kms into the ride for a stretch and a drink (and to clean the bugs off the visor again). 


After a quick pit stop I was on my way again. The 118 is one of my favourite roads in the province and I twisted and turned my way down it towards Canarvon and Minden where I was spending the night. Only a long delay in Haliburton for road works slowed the ride down. At least I know the fans are working on the C14. They cycled three times while we sat there wondering what the f*** was going on. It turned out a water pipe had burst across the road holding things up.


I pulled into the Red Umbrella Inn just outside of Minden at about 5pm. After getting cleaned up I rode into town for some of the best Thai I've had at Suwan's Thai Cuisine and picked up a couple of local craft brews from Boshkung Brewing Social (Minden really has everything you need) before filling up and heading back to the inn for a quiet night by the lake.


The next morning I was up early and over to the Mill Pond for breakfast. Great eggs and bacon and then it was an empty ride down the 118 to Bracebridge, Port Carling and finally Bala for a coffee before the last stretch through Wahta Mohawk Territory before popping out at the 400 and getting into the rapid flow south.

I dodged and weaved around Creemore, stopping once to change into lighter gear because the temperature had shot up with the humidity and made it home before the thunderstorms started. A nice way to spend a couple of days on the road. I only wish I'd had more time.


Wednesday 15 February 2023

Plastic Welding

 I thought I'd give this a go when I discovered that one of the plastic dash bits (used) for the 2010 C14/GTR1400 Concours was upwards of $150US +shipping. One of the benefits of reading Practical Sportsbikes Magazine is that they're always dropping technical hints and ideas. They mentioned plastic welding in one of their project bike articles, so I looked it up.

The repair kit cost less than $40CAD and includes a heating 'iron' with multiple ends and piles of plastic strips you can melt into a repair. Starting with a simple crack would have been easier, but I had to rebuild the broken end of a complicated plastic form, including a missing bolt hole.


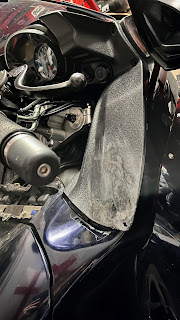
Here's the broken plastic dash panel:

I found a piece of plastic from a hex key tool with a matching sized hole, cut the end off the plastic bit  and grafted it on.

While that was cooling I melted some of the filler on the back and healed the crack up the middle.


I was liberal with the filler because I figured it would sand back. The only problem with this piece is that it's patterned on the surface and I'm not sure how I'm going to replicate that. The fix might be to take both pieces of and just paint them to a matching finish.


When I tried it for size, the panel lined up with the holes perfectly and is much more sturdy than it used to be. I'm going to finish sanding it and see if the raw finish bothers me while riding. If it does I'll take both dash panels off and paint both sides so they match. If I use a vinyl paint, I should get a matching finish that also acts like the original and would Armor-All up nicely.

So, what's plastic welding like? Pretty straightforward, and like most things if you practice you'll get better at it. The filler sticks provided in the kit melt easily under the iron and fill cracks and holes well. If you don't like the first go you can reapply heat and get it to set differently. If you're looking at absurd replacement costs for old plastic on a well used bike, a plastic welding kit is a good purchase.